CodeWars: Calculating With Functions

The Problem

Write functions that calculate integer arithmetic. For example.

seven(times(five()))

Should return thirty-five. Every number has a function and there are four operation-functions:

  • plus
  • minus
  • times
  • divided_by

All operations should return integers, not floats.

The Solution

# python
from functools import partial

def digit(operation=None, integer=None):
    """A base function to define a digit

    Args:
     operation: a function that expects an integer argument when called
     integer: an integer to return if no operation is passed in
    """
    if operation is not None:
        return operation(integer)
    return integer

# the digits
zero = partial(digit, integer=0)
one = partial(digit, integer=1)
two = partial(digit, integer=2)
three = partial(digit, integer=3)
four = partial(digit, integer=4)
five = partial(digit, integer=5)
six = partial(digit, integer=6)
seven = partial(digit, integer=7)
eight = partial(digit, integer=8)
nine = partial(digit, integer=9)

# the operations
def plus(right: int):
    return lambda left: left + right

def minus(right: int):
    return lambda left: left - right

def times(right: int):
    return lambda left: left * right

def divided_by(right):
    return lambda left: left // right

The Tests

expect(seven(times(five()))).to(equal(35))
expect(four(plus(nine()))).to(equal(13))
expect(eight(minus(three()))).to(equal(5))
expect(six(divided_by(two()))).to(equal(3))

Alternatives

There are several variations on the theme. One that I thought was similar in spirit to what I did but better was this one. Instead of separate operation and integer they use a default function that only returns what gets passed to it. So the definitions look like this.

def identity(integer: int) -> int:
    return integer

def zero(f=identity):
    return f(0)

def one(f=identity):
    return f(1)

def two(f=identity):
    return f(2)

def three(f=identity):
    return f(3)

def four(f=identity):
    return f(4)

def five(f=identity):
    return f(5)

def six(f=identity):
    return f(6)

def seven(f=identity):
    return f(7)

def eight(f=identity):
    return f(8)

def nine(f=identity):
    return f(9)

expect(seven(times(five()))).to(equal(35))
expect(four(plus(nine()))).to(equal(13))
expect(eight(minus(three()))).to(equal(5))
expect(six(divided_by(two()))).to(equal(3))

A Hybrid

To add a little of what the other solution is doing…

# python
from functools import partial

def identity(integer: int) -> int:
    """A pass-through function

    Args:
     integer: a digit input

    Returns:
     the integer given
    """
    return integer

def digit(operation=identity, integer=None):
    """A base function to define a digit

    Args:
     operation: a function that expects an integer argument when called
     integer: an integer to return if no operation is passed in
    """
    return operation(integer)

# the digits
zero = partial(digit, integer=0)
one = partial(digit, integer=1)
two = partial(digit, integer=2)
three = partial(digit, integer=3)
four = partial(digit, integer=4)
five = partial(digit, integer=5)
six = partial(digit, integer=6)
seven = partial(digit, integer=7)
eight = partial(digit, integer=8)
nine = partial(digit, integer=9)

# the operations
# this is a style some people used. I'm not sure I like it.
plus = lambda right: lambda left: left + right
minus = lambda right: lambda left: left - right

# alternatively you could just do this
def times(right: int): return lambda left: left * right
def divided_by(right): return lambda left: left // right

expect(seven(times(five()))).to(equal(35))
expect(four(plus(nine()))).to(equal(13))
expect(eight(minus(three()))).to(equal(5))
expect(six(divided_by(two()))).to(equal(3))

Coding Train Starfield

The Starfield

This is another p5.js hello-world, this time taken from Daniel Schiffman's Starfield in Processing coding challenge. It's a rough version of traveling through the stars at warp speed. He managed to do it in about 15 minutes, if I remember correctly. It starts static but if you move your mouse back and forth horizontally it adjusts the speed.

The Main Sketch

The most basic processing/p5 sketch uses two functions setup to initially set up your canvas and draw to update the frames over time. This function creates our canvas and star objects in the setup and then calculates a speed based on the mouse position of the user in order to update the stars. It gets passed a p5 element, called p, in order to get access to the p5.js code.

/** The main sketch
 * this gets passed to p5 so it defines the setup and draw functions
 * that p5 expects
*/
let starfield_sketch = function(p) {
  let star_count = 800;
  let parent_div_id = "schiffman-starfield";
  p.BLACK = 0;
  p.WHITE = 255;
  p.ALPHA = 100;

The Setup Function

Not too much voodoo here, other than the use of the JQuery outerWidth method which gets the width of the DIV that we're using to hold the sketch and uses it as the width for the canvas.

p.setup = function() {
  p.stars = [];
  this.canvas = p.createCanvas($("#" + parent_div_id).outerWidth(true), 800);
  for (let i=0; i < star_count; i++) {
    p.stars[i] = new Star(p);
  }
} // end setup

Draw

Again, not too fancy. The draw function:

  • Sets the background to black to wipe out our previous drawing
  • gets the "speed" of the stars using the x-position of the mouse and mapping this location from 0 to the width of the canvas to a smaller range from 0 to 50
  • Translate the (0, 0) of the coordinate system from the top left of the canvas to the middle so our stars emerge from the center instead of the top left
  • update all the stars with the speed and re-draw them
  p.draw = function() {
    p.background(p.BLACK, p.ALPHA);
    speed = p.map(p.mouseX, 0, p.width, 0, 50);
    p.translate(p.width/2, p.height/2);
    for (let i=0; i < p.stars.length; i++){
      p.stars[i].update(speed);
      p.stars[i].show();
    }
  } //end draw
}; //end starfield_sketch

The Star Class

The Star stores the position of a "star" and updates it based on the speed that it's given. Our initial constructor sets up the coordinates of the star using random values.

function Star(p) {
  this.x = p.random(-p.width, p.width);
  this.y = p.random(-p.height, p.height);
  this.z = p.random(p.width);

The Update

Most of the time the update reduces the z value by the current speed, but since we don't want the stars to go off the canvas and disappear, if it gets too small we re-randomize the position of the star.

this.update = function(speed) {
  this.z = this.z - speed

  if (this.z < 1) {
    this.x = p.random(-p.width, p.width);
    this.y = p.random(-p.height, p.height);
    this.z = p.random(p.width);
  }
} //end update

The Show Function

The show function is where most of the work is done. It calculates the proprotions of x and y to z and then maps that to the width and height of the canvas and then draws an ellipse. To get the radius of the ellipse we map the current z-value using an inverted target of 16, 0. This means that as z gets smaller our radius gets bigger.

  this.show = function() {
    p.fill(p.WHITE);
    var x_now = p.map(this.x/this.z, 0, 1, 0, p.width);
    var y_now = p.map(this.y/this.z, 0, 1, 0, p.height);

    var radius = p.map(this.z, 0, p.width, 16, 0);
    p.ellipse(x_now, y_now, radius, radius);

    p.stroke(p.WHITE);
  } // end show
}; //end class Star

Attaching the Sketch

This next bit attaches our sketch to a specific DIV defined in the HTML. You don't have to do this, you could just use the parts as universal functions like the examples show, but if you have more than one sketch on a page sometimes things get funky so I prefer this pattern to keep everything in place.

// Attach the starfield_sketch function at the top to the div with ID
// schiffman-starfield
sketch_container = new p5(starfield_sketch, 'schiffman-starfield');

Source

CodeWars: Vowel Count

The Problem

Given a string, count the number of vowels in it. The vowels are "aeiou" and the letters will be lower-cased.

The Solution

The Tests

# pypi
from expects import equal, expect

expect(vowel_count("a")).to(equal(1))
expect(vowel_count("rmnl")).to(equal(0))
expect(vowel_count("a mouse is not a house")).to(equal(10))

The Function

VOWELS = set("aeiou")

def vowel_count(letters: str) -> int:
    """Counts the number of vowels in the input

    Args:
     letters: lower-cased string to check for vowels

    Returns:
     count of vowels in the letters
    """
    return sum(1 for letter in letters if letter in VOWELS)

Alternatives

One solution used regular expressions and the findall method. This seems better in a generalizable sense, but I think that the findall will build a list rather than a generator so might not be as efficient space-wise, and is probably slower. Others used the python string method - count. I think this problem is so easy that there's really not a lot of stuff you can do that doesn't overcomplicate things.

Anyway, day one.

End

Mozilla Madness: Resist Fingerprinting!

The Short Version For My Future Self

Although some sites tell you to set Firefox's privacy.resistFingerprinting option to true, it breaks altair's interaction and some other sites that use the canvas. It's probably better not to use that option, but if you do either:

  • Install the Toggle Resist Fingerprinting extension and turn it off when things break (or just keep turning it off in about:config).
  • Or set privacy.resistFingerprinting.autoDeclineNoUserInputCanvasPrompts to False and accept the popup requests for the page you want to use.

Back To the Story: It Was a Dark and Rainy Day

I decided to give altair, the python data visualization library a try yesterday, just to see what it looked like. I ran their "hello, world" example and managed to get a plot.

Figure Missing

Nothing fancy. If you move your cursor over the bars you might get a tool-tip giving you the width of the bar. If you do then you don't have the problem I ran into yesterday when I was trying it out. The image itself came out clear enough, but I couldn't figure out how to make the tool-tips work. I got desperate enough to try and read the documentation but it seems to be split between examples and API descriptions with little more in the way of explanatory documentation that would help to figure out how it was supposed to work. There are a lot of examples, though, so I decided to see if they would help, but then when I was looking at their Scatter Plot with Tool-tips example I noticed that their plots didn't have tool-tips either, which seemed suspicious. Was their library that broken? Was the internet?

I took a look at the JavaScript console and that's when I saw these messages.

nil

It looked like it might be important, but when I went searching for the message I couldn't find anything relevant. At least not at first.

Start With the Nuclear Option

My first thought was that they had somehow made altair Chromium-only so I installed brave and, sure enough, the tool-tips worked when I switched browsers. So my initial conclusion was that I'd have to switch browsers if I decided to use altair. But then it occurred to me that I'd had problems in the past with some sites and anti-tracking options turned on in firefox so maybe it had something to do with that or one of the extensions. The question was, what setting was it or what extension? I eventually decided it was too much work to figure out so I first tried to use Troubleshoot Mode to disable all the extensions, and when that didn't work, I did a refresh and wiped out all the customizations I'd done to firefox. Amazingly, this worked, but now I had to go about setting Firefox up again while avoiding whatever I did that broke altair.

The Slow Crawl Back

I decided to follow the advice on the restoreprivacy.com page, just because it came up on the first page of my search results and it seemed to touch most of the bases that I'd run before this episode. As I did a step in the setup I would check back with the altair plot to make sure that the tool-tip was still working until, eventually, I came to the setting that broke it - privacy.resistFingerprinting.

nil

When I set it to true the tool-tips would break and when I set it to false they would work again. So, then what? I didn't want to disable fingerprint protection, so I thought I'd do a little more searching and see if there was another way.

Is It a Bug?

I decided to do a search on Bugzilla and found what seemed like a relevant bug: WhatsApp Web images broken if you flip `privacy.resistFingerprinting` due to canvas prompts without user interaction. The discussion is about What's App and also mentions Instagram and Twitter, and although they are focused on images, the actual error seemed close enough to what I was seeing that it seemed like it might be the same or a similar thing. But the bug was opened two years ago, so if it is a bug it doesn't seem to be something they're eager to fix. Then I ran across this bug: Do not display Canvas Prompt unless triggered by user input which discusses changing the default behavior to not prompt the user for permission to use the canvas. Now that I'm describing it I'm not sure how I came to this next step based on that bug, but for some reason I went looking in about:config again and noticed that right under resistFingerprinting was resistFingerprinting.autoDeclineNoUserInputCanvasPrompts:

nil

This option is set to True by default and seemed to be what they were talking about in the bug so I turned it off and went back to the altair page and this time when I put my cursor over the plot a popup came up asking me for permission.

nil

Once allowed it, it worked, even with resistFingerprinting set to true. So, if I understand what the bug reports were saying, what was causing the problem is that firefox is getting a request for the canvas but it decides that it isn't the user initiating it, so it needs extra permission but by default the box to ask for permission is turned off and the request is declined without the user (me) getting any feedback. This seemed like a bug.

As I was thinking about this I remembered that a couple of days ago I went to the kindle cloud reader and one of the books wouldn't render. I went back and played with turning resistFingerprinting on and off before trying to load the ebook and this was apparently the culprit so it isn't just altair that's affected for me.

So it's a bug, right? It seemed like one, but there were already reports of this phenomena for other sites going back years so they appear to have done it on purpose. I was trying to figure out whether it was something that should be reported or not when I came upon this bug: Users enable `privacy.resistFingerprinting` and then are surprised when it causes problems.

nil

Despite the fact that I've seen multiple sites saying to enable this "feature" maybe it isn't really a good idea after all. In the near-term I installed the Toggle Resist Fingerprinting extension and use it to turn resistFingerprinting on and off. To be honest, I'm not convinced that it really matters, I just got sucked into a trail of sites making conflicting assertions about what to do and convinced myself that I cared. At least I can read kindle books in the browser again.

Cuda, Conda, Docker...ugh

The Beginning

I haven't been doing anything with pytorch recently so I decided to restart by setting up a docker container on my machine with a beefier nvidia card than the machine I had been using. I've learned a little bit more about docker since I built my earlier container so I decided to update the image and found it both easier and harder than I remember it being. It went easier because I knew more or less what I had to do so I knew what to look up. Harder because there's some workarounds that you have to work with that weren't there before, and I decided to stick with conda, which seems to add an extra layer of difficulty compared to pip and virtualenv when you use docker. But, anyway, enough with the whining, here's the stuff.

Note: I'm doing this on Ubuntu 21.10.

Nvidia-Container-Toolkit and Ubuntu

The first thing you should do is install the nvidia-container-toolkit. The instructions say to add the repository this way:

distribution=$(. /etc/os-release;echo $ID$VERSION_ID) \
   && curl -s -L https://nvidia.github.io/nvidia-docker/gpgkey | sudo apt-key add - \
   && curl -s -L https://nvidia.github.io/nvidia-docker/$distribution/nvidia-docker.list | sudo tee /etc/apt/sources.list.d/nvidia-docker.list

This introduces two problems for me. The first is that this assumes you use bash, but I'm using fish so the command doesn't work. This is no big deal since I just looking in the /etc/os-release file to get the ID and VERSION_ID and wrote it out.

curl -s -L https://nvidia.github.io/nvidia-docker/gpgkey | sudo apt-key add -
curl -s -L https://nvidia.github.io/nvidia-docker/ubuntu21.10/nvidia-docker.list | sudo tee /etc/apt/sources.list.d/nvidia-docker.list

But then this introduces the second problem - the second curl fails with the message:

Unsupported distribution!
Check https://nvidia.github.io/nvidia-docker

It turns out there's an open bug report on GitHub, with a comment that only Long-Term-Support versions are supported. The commenter suggested using 18.04 for some reason, but I went with 20.04 and it seemed to work.

curl -s -L https://nvidia.github.io/nvidia-docker/ubuntu20.04/nvidia-docker.list | sudo tee /etc/apt/sources.list.d/nvidia-docker.list

sudo apt update
sudo apt install nvidia-container-toolkit

The Cuda Image

Now that I was setup to run the container I ran a test.

docker run --rm --gpus all nvidia/cuda:11.4.2-cudnn8-devel nvidia-smi

Which gave me an error, something like Error response from daemon (I don't remember exactly), which turns out to be the result of a pretty major flaw right now (as noted on the github issue for it). One of the commenters posted a work-around for it which seems to work.

Edit /etc/nvidia-container-runtime/config.toml

In the file there's a line:

#no-cgroups = false

Uncomment it and set it to true.

no-cgroups = true

Okay, easy-peasy. All fixed, then, right? Well, doing this fix means that you now have to pass in more flags when you run the container. First you need to check what you have.

ls /dev | grep nvidia

Then when you run the container you need to pass in most of those things as --device arguments.

docker run --rm --gpus all --device /dev/nvidia0 --device /dev/nvidiactl --device /dev/nvidia-modeset --device /dev/nvidia-uvm nvidia/cuda:11.4.2-cudnn8-devel nvidia-smi

You might not need to actually look in /dev first. I had to because the post on github was referring to a /dev/nvidia1 device, but I don't have one. This appears to work, although it's a bit unwieldy.

Now for Conda

This next bit probably shouldn't be registered as a problem, but the last time I tried to run pytorch in docker there was some kind of bug when I installed it with pip that went away when I installed it with conda so I decided to stick with cuda, but I also wanted to try and set it up the way I do with virtualenv - cached by docker and run non-root. This turns out to be much harder to do than with virtualenv for some reason. I looked through some posts on StackOverflow and elsewhere and didn't really see any good solutions, but this one on Toward Data Science got close enough. The way that post suggests is to change the shell that docker uses to bash and moving the miniconda install path into the home directory of the user that you want to run it.

I won't bother with all of the Dockerfile, but the basic changes are:

Change the shell.

SHELL [ "/bin/bash", "--login", "-c" ]

Switch to the user (assuming you added the user and home directory earlier in the docker file) and add an environment file to store the directory in (I don't think you need to use ENV but the post used it. I'll try ARG later).

USER ${USER_NAME}
WORKDIR ${USER_HOME}

ENV CONDA_DIR=${USER_HOME}/miniconda3

Then install miniconda.

ARG MINICONDA_URL="https://repo.anaconda.com/miniconda/Miniconda3-latest-Linux-x86_64.sh"
ARG SHA256SUM="1ea2f885b4dbc3098662845560bc64271eb17085387a70c2ba3f29fff6f8d52f"
ARG CONDA_VERSION=py39_4.10.3
RUN --mount=type=cache,target=/root/.cache \
    wget "${MINICONDA_URL}" --output-document miniconda.sh --quiet --force-directories --directory-prefix ${CONDA_DIR} && \
    echo "${SHA256SUM} miniconda.sh" > shasum && \
    sha256sum --check --status shasum && \
    /bin/bash miniconda.sh -b -p ${CONDA_DIR} && \
    rm miniconda.sh shasum

ENV PATH=$CONDA_DIR/bin:$PATH

Update conda.

RUN echo ". $CONDA_DIR/etc/profile.d/conda.sh" >> ~/.profile && \
    conda init bash && \
    conda update -n base -c defaults conda

Install the packages. This is where I added the caching to try and reduce the re-downloading of files. I don't really know if this helps a lot, to be truthful, but it's nice to have new things.

RUN --mount=type=cache,target=/root/.cache \
    conda install pytorch torchvision torchaudio cudatoolkit --channel pytorch --yes

PuDB Remote

In the Beginning

This is a post on using PuDB via telnet.

Short Version

In case I forgot what to do and just want to read this to remember.

  1. In the screen where you are going to run telnet, run tput cols and tput lines to find out the number of columns and lines that the screen is using.
  2. In the code where you want the break, instead of the usual import pudb; pudb.set_trace() use:
from pudb.remote import set_trace
set_trace(term_size=(columns, lines))

When the code hits the breakpoint it will start up a telnet service and you can log into it from the other screen:

telnet 127.0.0.1 6899

Okay, So Now Why Would You Do This?

I was trying to build one of my sites that uses nikola and this strange error came out saying that one of the shortcodes was getting the "site" argument multiple times. I had no idea what was going on and nikola doesn't pre-define the arguments to the shortcode-plugins (it parses the text and then passes the arguments along using the *args **kwargs convention) which makes it flexible, but figuring out a problem with the arguments is pretty tough, so I decided to turn to my old standby PuDB, which I've been using for so many years now, and is my favorite of the python debuggers I've tried.

I did my usual thing and found the line in the nikola code that was raising the error and inserted a breakpoint further up in the code.

if name == "lancelot":
    import pudb
    pudb.set_trace()

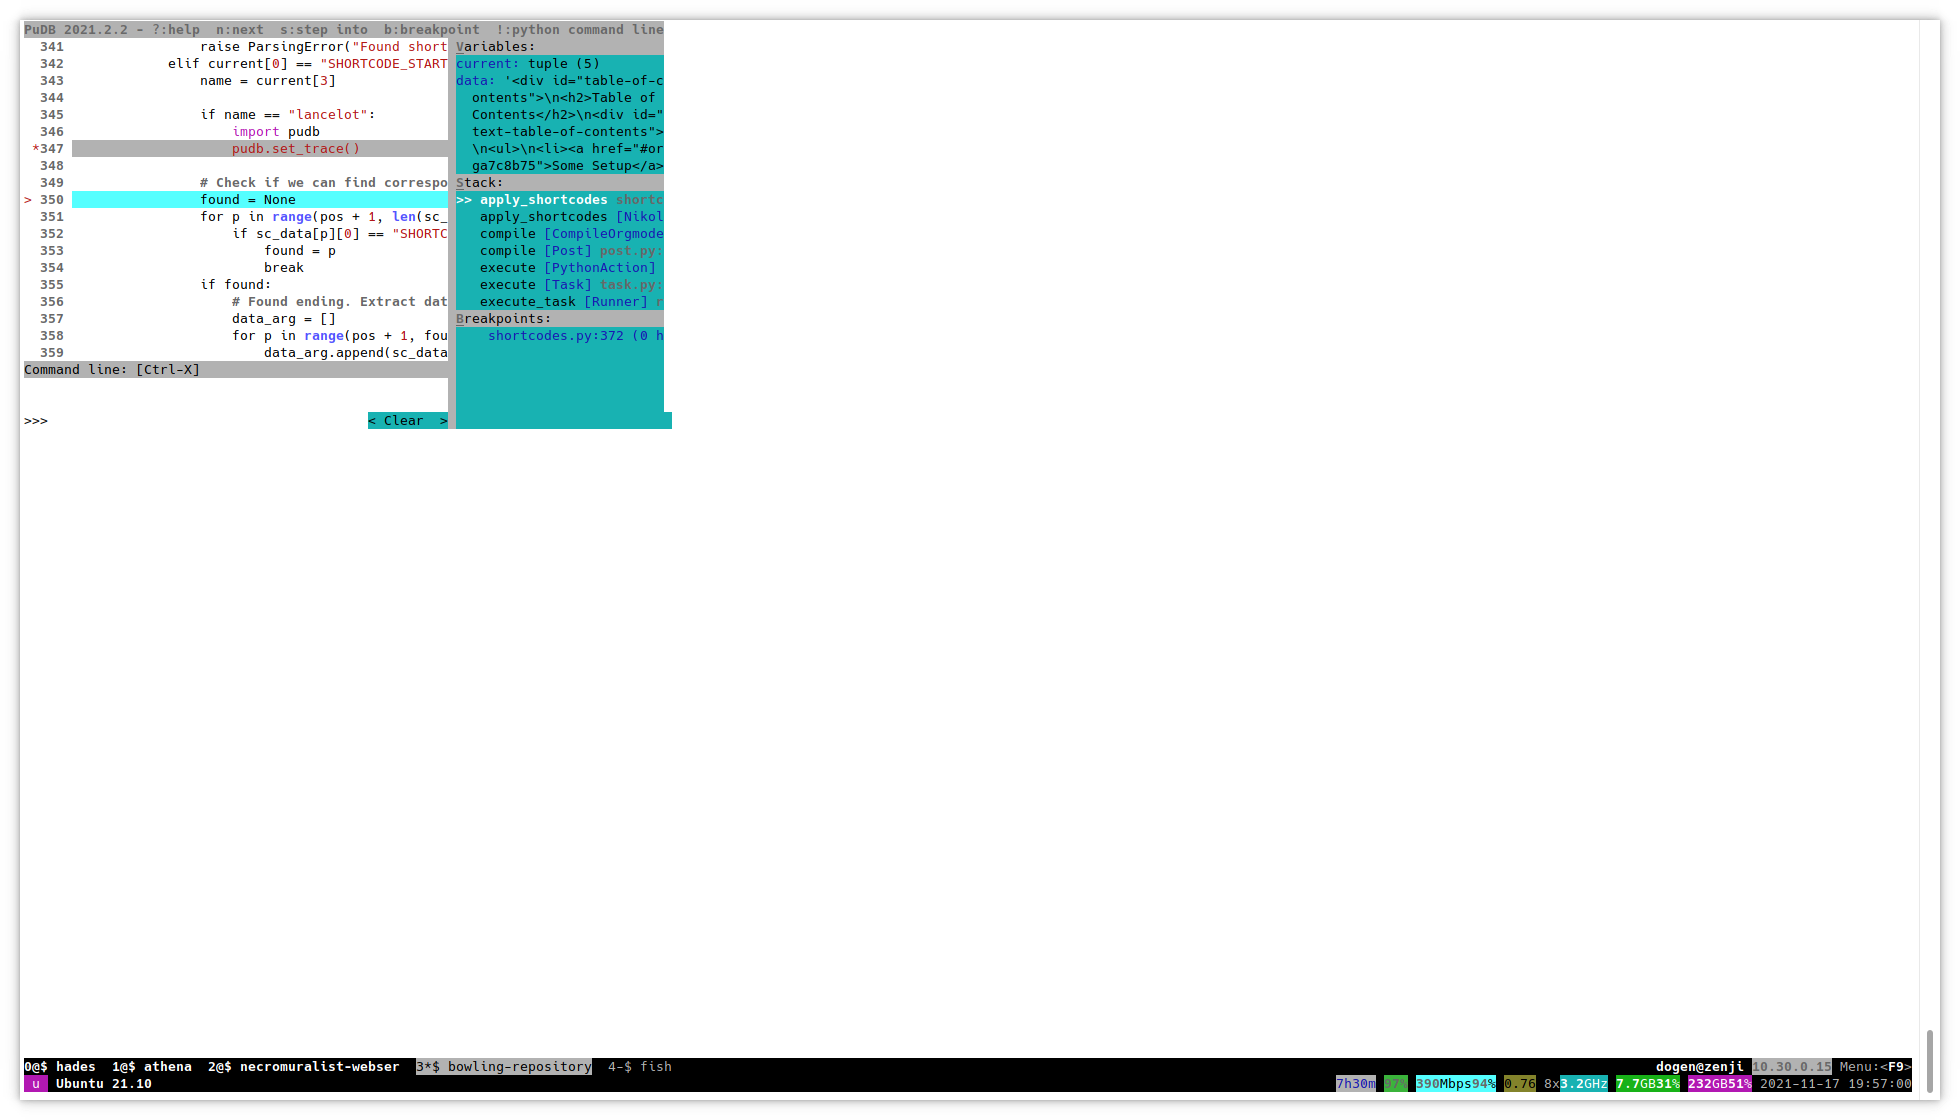
I figured the problem was with my shortcode, named lancelot, and the conditional allowed me to skip all the other shortcodes being used. But then, when I ran the build (nikola build -v2)… disaster.

nil

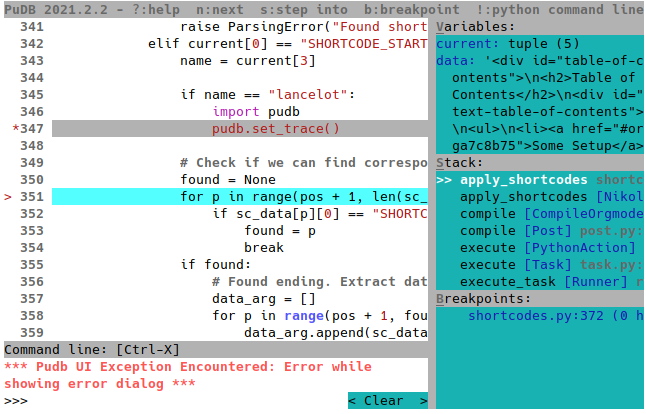
For some reason it wouldn't use the entire screen, making it impossible (or at least really hard) to read some of the variables that I wanted to check - and even worse, when I tried to open up the ipython terminal in it I got an error message.

nil

The error-message is one of those error-after-the-error messages that you sometimes run into. It was trying to notify me of an error by popping up some kind of dialog but then the dialog wouldn't open so it told me about the dialog error and didn't get around to telling me what the original error was. In any case, something was broken, so I had to resort to desperate measures - I went to read the documentation.

Surprisingly, there actually is some (there wasn't really much when I first started using it).

Dead Ends

The first couple of things I tried seemed promising, but they didn't work.

Another Screen

There wasn't anything about re-sizing the window, but it did mention that you can have the output come out in a different terminal from the one where you run the code, so I gave it a go. I made a different screen and got its file-path using the tty command (/dev/pts/6 in this case). Then I set an environment variable to hold the file-path in the screen where I was running the code (set -x PUDB_TTY /dev/pts/6). This caused PuDB to pipe the output to the next screen - and it did work to send the first PuDB output to the other screen, and it did use the whole window, but then it quit instead of letting me use the debugger. Not quite what I wanted, so I unset the environment variable and moved on.

term_size

The documentation also showed how to use PuDB as a remote debugger, and in the example they passed in the argument term_size to set_trace so I thought, since the functions have the same name, that the set_trace I was using would take the same arguments. So I tried it.

import pudb
pudb.set_trace(term_size=(236, 61))

Using the values that I had gotten from tput using tput cols and tput lines. But that just raised an ArgumentError. The functions have the same name, but not the same arguments.

Telnet

So then I decided to try their remote version. It doesn't really make sense to me that it would work better than the regular version, but I didn't see any other choice. So instead of the usual code to insert a breakpoint I used:

from pudb.remote import set_trace
set_trace(term_size=(236, 61))

When I ran the build it stopped and told me to telnet into the localhost address at port 6899.

nil

So I changed into the other screen and ran telnet.

telnet 127.0.0.1 6899

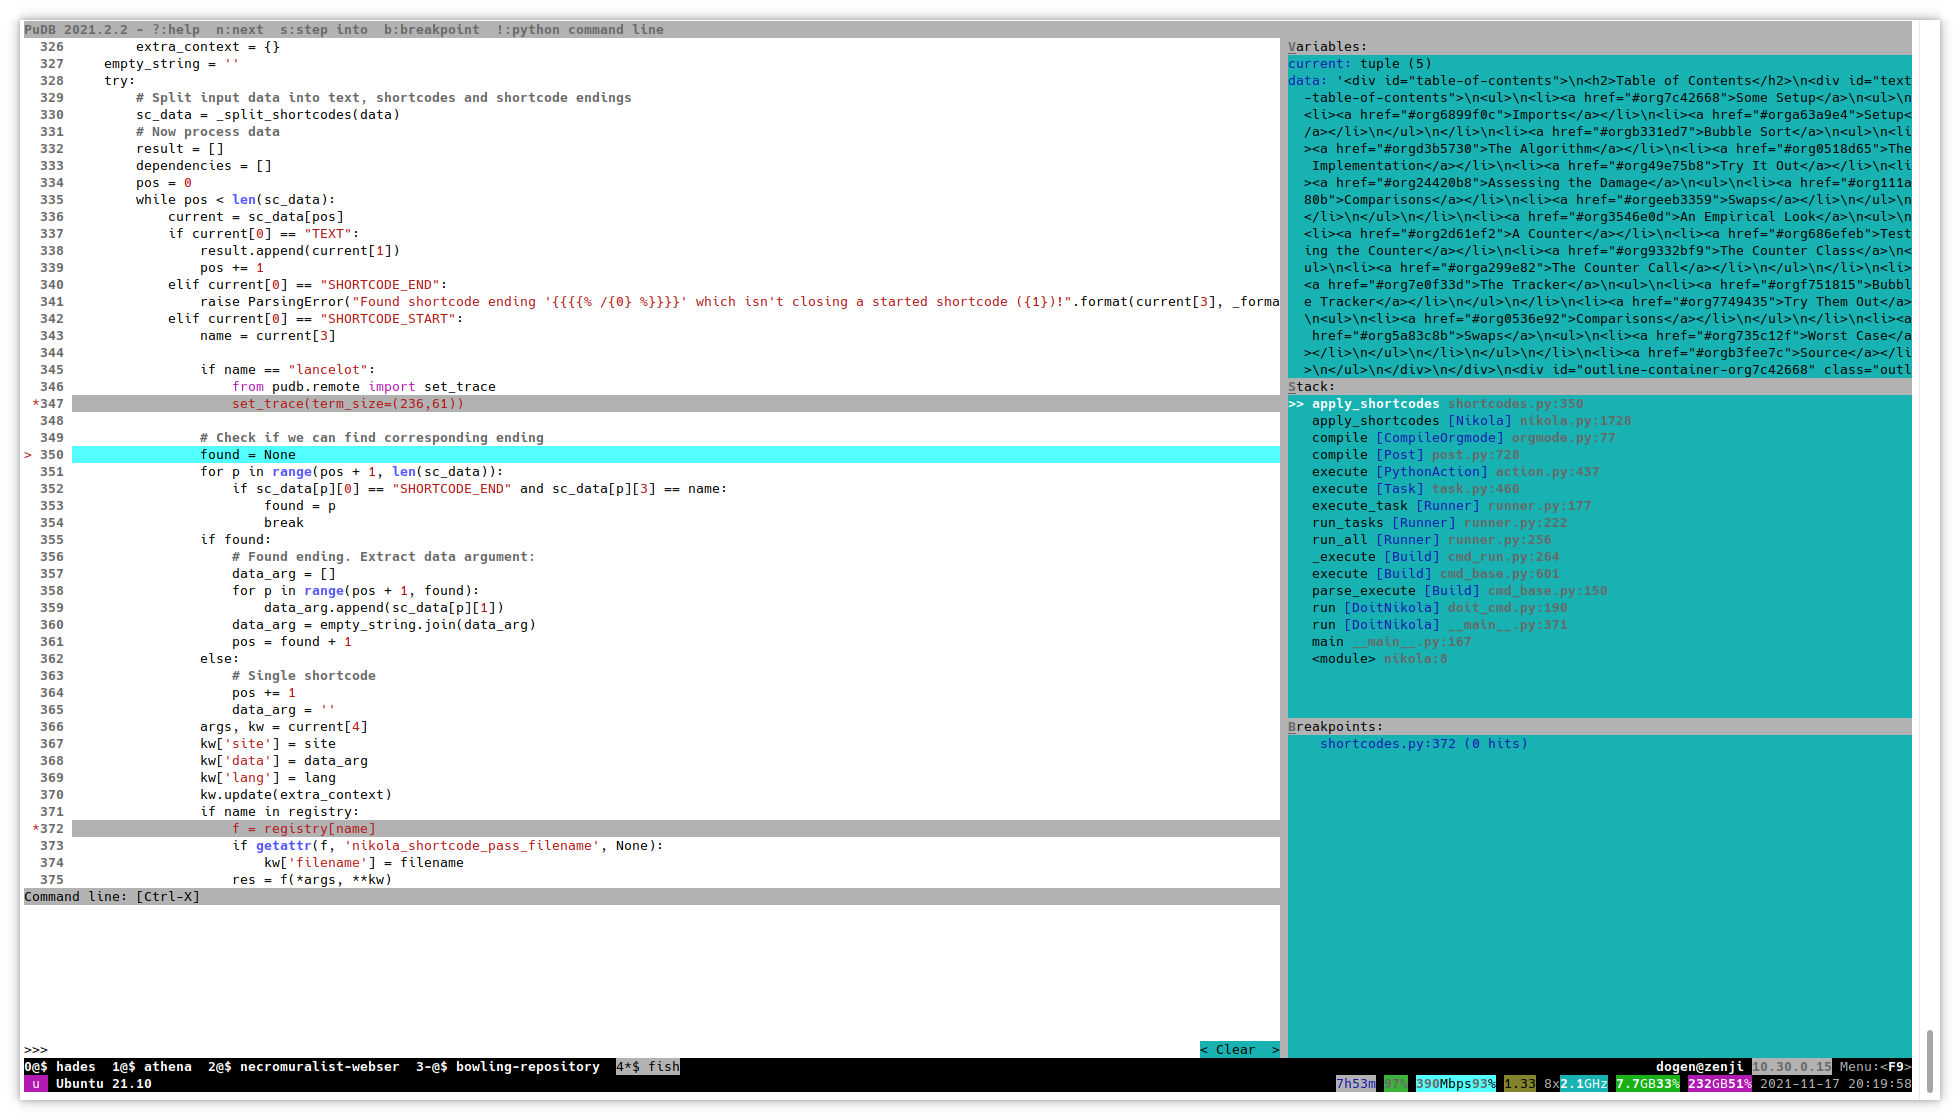
And what do you know.

nil

This turns out to not be a complete fix. Hitting ! to get to the ipython terminal froze PuDB, but this was enough for me to inspect the variables and realize that I just needed to move one of the parameters in the definition of my shortcode method and it worked.

But It's Not Fixed?

Well, if this were a more intense debug I really would want the ipython~/~ptipython terminal, but since this is the first time I've tried to run PuDB under KUbuntu's Konsole instead of the GNOME terminal I'm hoping that just switching back to the other terminal will be enough - I'll have to test that once I'm more motivated.

Emacs Scrollbar Artifact on Kubuntu

What's this then?

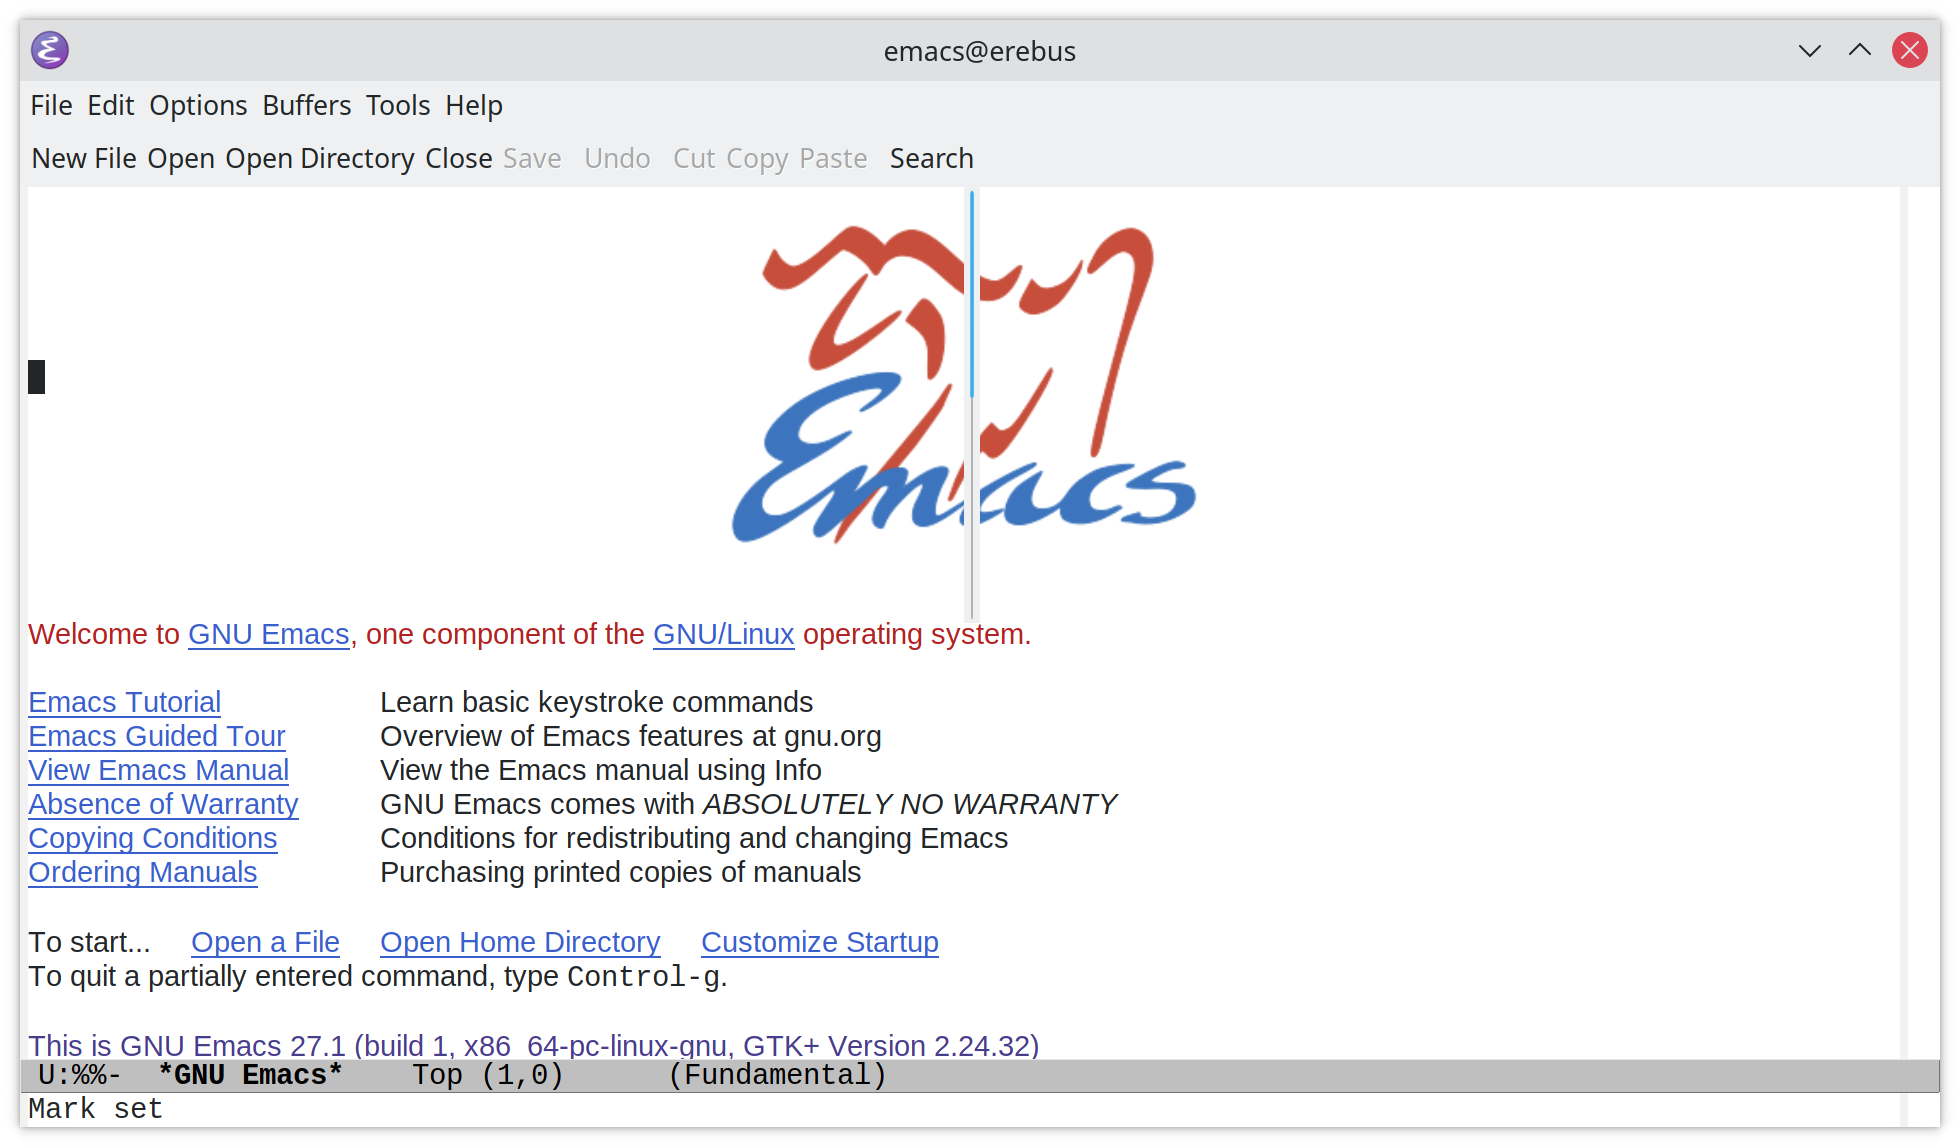
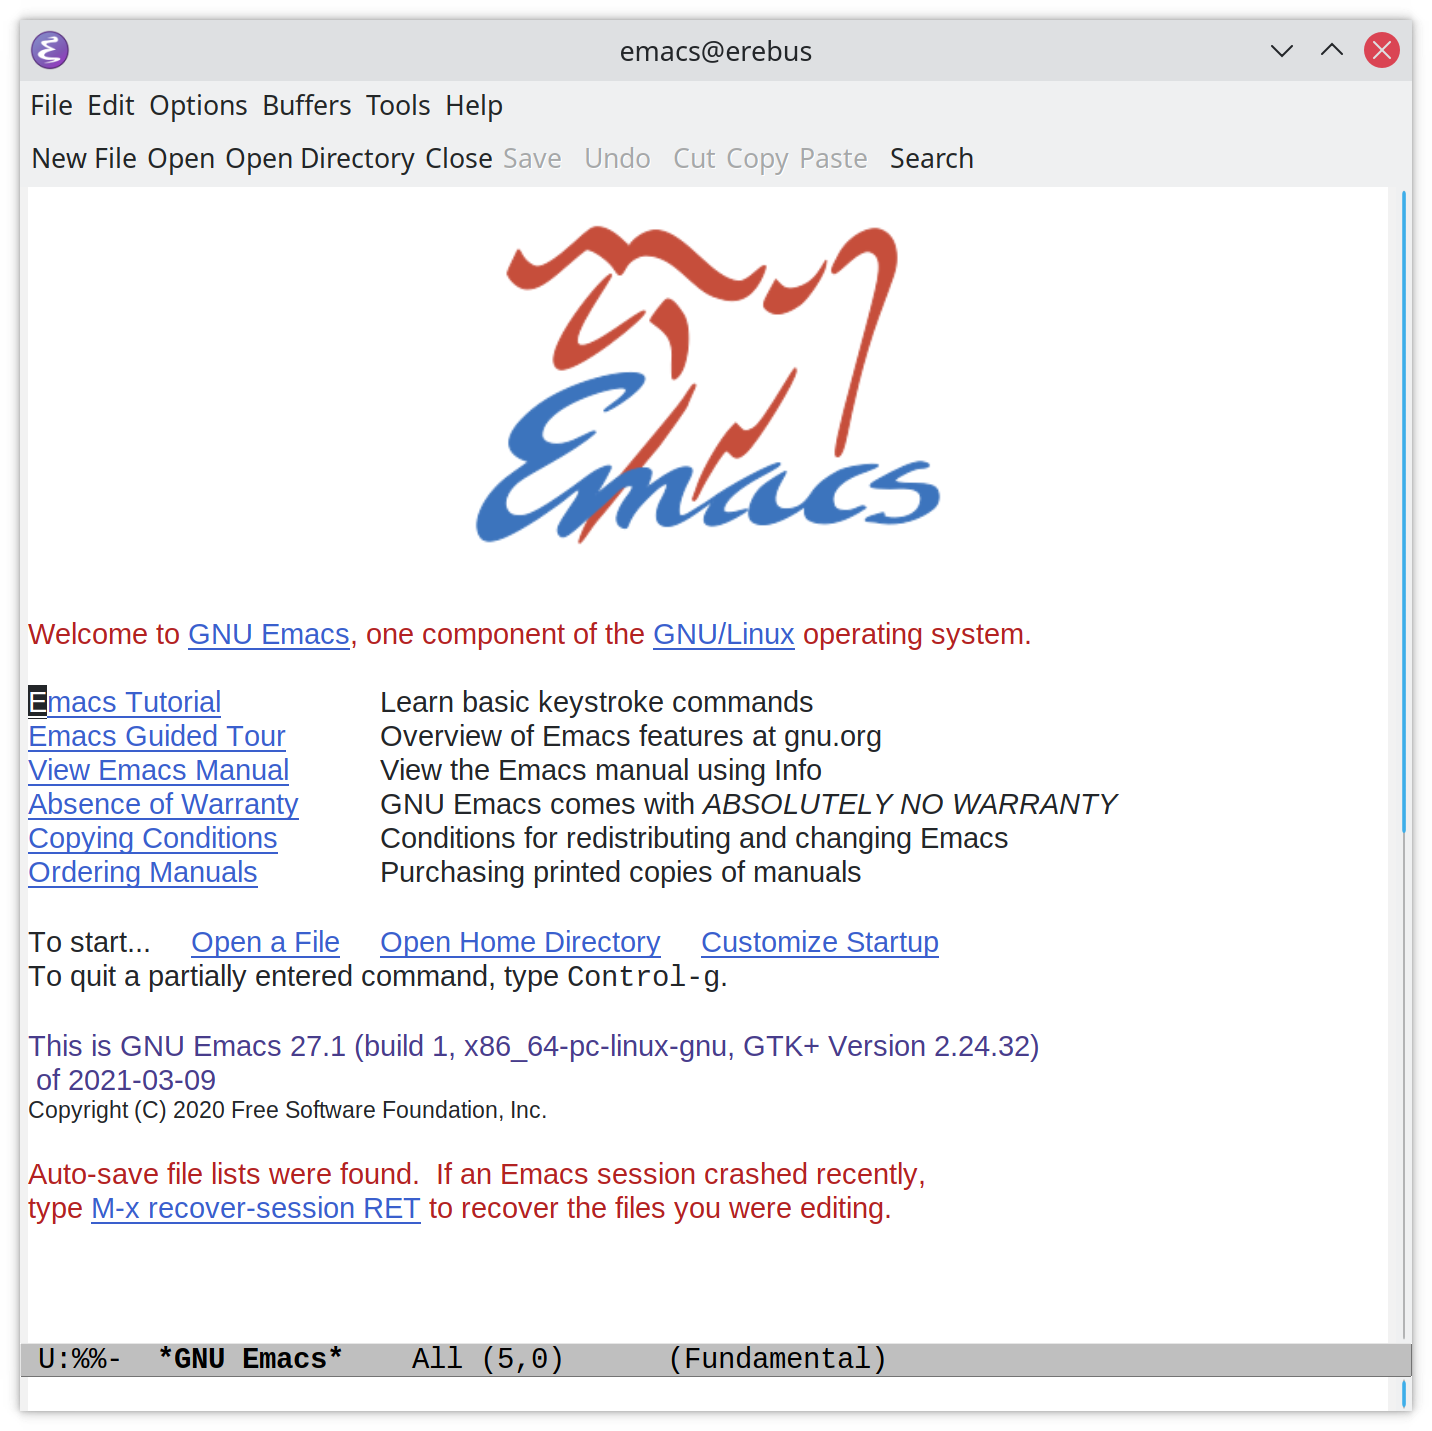
I switch back and forth between Kubuntu and Ubuntu (Ubuntu seems to work better, but I like the aesthetics of Kubuntu) and one of the problems I had was that when I launched emacs in Kubuntu it had a permanent scrollbar in the center of the window that blocked out whatever text was there.

nil

It's more of an annoyance than anything else but since it doesn't happen on Ubuntu I figured I'd try and fix it. It took me a couple of different searches to find the answer so I thought I'd document it in case I need to remember this later.

The Cause

This is the desktop that's causing the problem:

nil

It turns out that it's because my monitors are of different resolutions and in order to be able to read anything on the higher-resolution monitor I had to set the display scale to 200%, but this causes a problem with the scaling of the widgets (at least that's what it said on the reddit post where I found the solution).

The Fix

The fix for me was to edit the ~/.local/share/applications/emacs.desktop file so that the EXEC line read:

Exec= /usr/bin/env GDK_SCALE= emacs

Once this was in place the artifact went away.

nil

The Source

I linked to it above, but this is the reddit post where I found the fix:

Building fastai's Documentation

What is this about?

I've decided to try and build as much of the documentation that I use all the time on my local system, not just so that I'll have it if my internet connection goes down but also so that I won't be distracted by what's happening on the web. This is about building fastai's documentation, which was a little trickier than I thought it would be so I decided it would be worth it to make a note for the future.

You can skip to the In A Nutshell section of the post to get a summary of the steps without all the exposition that the middle section has.

What happened?

The Repository

The first thing I did was clone the fastai git repository from github. If you inspect it there's a folder called docs_src which seemed to logically mean that that's where the source files for the documentation are but when you go in there you won't find an index.html file, which seemed peculiar. There's a Makefile at the root of the repository so I inspected it and found that there's a rule:

docs: $(SRC)
        rsync -a docs_src/ docs
        nbdev_build_docs

So I tried a naive make docs but of course it failed because there's nothing called nbdev_build_docs, so I searched online and found out that nbdev is a fastai project to make jupyter notebooks into a Literate Programming system and that nbdev_build_docs is one of their command-line commands, so I installed it through pip:

pip install nbdev

And re-ran the make command, which did nothing because the rsync command had already created the docs folder and for some reason this made the nbdev_build_docs command not work. So I removed the docs folder and re-ran it, which produced a big dump of errors because in converting the notebooks nbdev was importing a bunch of python code that wasn't installed. Interestingly, at this point the docs folder actually has enough to run the site, despite all the error-messages, but if you just try to load the files into a browser you can see that it's kind of broken, so then I went looking for what was going on.

Jekyll and Hide

For some reason I couldn't find anything in the documentation on building it, but searching for "fastai build documentation" brought an outdated page that tells you how to build the documentation but was written for the prior version of fastai (v1) so much of it doesn't make sense for v2 (e.g. it refers to a non-existent tools folder), which I didn't figure out at first because the sites for v1 and v2 don't really identify their version, except in the URL for the old site.

All You Need

Reading that documentation it turns out that they're using Jekyll, so if you install it you just need to run Jekyll in the docs folder.

cd docs
bundle exec jekyll serve

And the site is ready to read at http://localhost:4000 and at this point you're good to go - but, of course, I didn't realize that and tried to fix the error messages first, which is what the rest of this post is about.

Fixing the Imports

There's three things you need to do to fix the imports:

Installing fastai

The old documentation recommended installing it in development mode. I don't know if that's strictly necessary, but it fixed a lot of things so it seems like a good idea.

In the root of the fastai repository run pip.

pip install -e ".[dev]"

This installs a lot of stuff so you might want to go get a cup of coffee (or maybe a cocktail) at this point while it does its thing. The settings.ini file lists the dev_requirements and the regular requirements if you want to see what needs to be installed in either case.

Installing Flask Compress

This is pretty straight-forward, just use pip.

pip install flask-compress

Install Azureml-core

  • The Problem

    This wasn't quite so straight-forward, which is why I put it in a separate section. If you try to install it in Ubuntu 21.04 (or 20.04, etc.) you will get a big blob of error messages ending in this.

    ERROR: Command errored out with exit status 1: /home/hades/.virtualenvs/fastai-clean/bin/python -u -c 'import io, os, sys, setuptools, tokenize; sys.argv[0] = '"'"'/tmp/pip-install-srnkqokl/ruamel-yaml_803314568
    e8f4fa49015a45528d277b2/setup.py'"'"'; __file__='"'"'/tmp/pip-install-srnkqokl/ruamel-yaml_803314568e8f4fa49015a45528d277b2/setup.py'"'"';f = getattr(tokenize, '"'"'open'"'"', open)(__file__) if os.path.exists(_
    _file__) else io.StringIO('"'"'from setuptools import setup; setup()'"'"');code = f.read().replace('"'"'\r\n'"'"', '"'"'\n'"'"');f.close();exec(compile(code, __file__, '"'"'exec'"'"'))' install --record /tmp/pip
    -record-yfvqflby/install-record.txt --single-version-externally-managed --compile --install-headers /home/hades/.virtualenvs/fastai-clean/include/site/python3.9/ruamel.yaml Check the logs for full command output
    

    Which isn't really all that helpful. Scrolling up, it looks like the problem was with something called ruamel.yaml, so investigating this seemed like a place to start, but, of course, the error messages are completely inscrutable now that I haven't programmed in C for so many years so I decided to search the web instead of trying to debug it directly, figuring that someone else must have had this problem.

    This lead to a long search through various posts, but what it turned out to be was that both ruamel.yaml and azureml-core don't support python 3.9 yet (there are some bug reports on GitHub for it already) so you can't install it with the version that currently ships with Ubuntu (3.9.5) or anything above python 3.8.

  • The Fix

    The fix I decided to use was to install pyenv using their installer. Once you run the installer and follow the rest of their installation instructiors it's fairly straightforward to set up so I won't go into it.

    I decided to use python 3.8.10 so to install it you do this:

    pyenv install 3.8.10
    

    The only thing that didn't work for me was their pyenv which function which is supposed to show you the location of the python installation. The command might work but I couldn't figure out the arguments to use (updating the example they gave didn't work for me). It turned out the python binary was at:

    ~/.pyenv/versions/3.8.10/bin/python
    

    pyenv has it's own system for creating a virtual environment, but since I'm already using virtualfish and didn't want to try and troubleshoot yet another method I created a virtual environment the way I usually do it.

    ~/.pyenv/versions/3.8.10/bin/python -m venv fastai-doc
    

    At this point I activated the new virtual environment and had to re-do previous installation steps (for fastai and flask_compress) as well as the azure-ml installation.

    pip install -e ".[dev]"
    pip install flask-compress azureml-core
    

    The installation of fastai installs nbdev as one of the requirements so that didn't have to be re-done. And now I built the documentation and ran the jekyll server. Easy-peasy.

    make docs
    cd docs
    bundle exec jekyll serve
    

In A Nutshell

The Minimum to Get the Documentation

  • Clone the fastai git repository from github
  • Install jekyll and nbdev
  • Change into the root of the fastai repository you cloned
  • Run make docs and ignore the error-messages
  • Change into the docs folder that was created and run the jekyll server (bundle exec jekyll serve)

To Fix All the Errors

This isn't really necessary to get the documentation, but I think it's better, since you don't have to ignore all the error messages.

  • Clone the fastai git repository from github
  • Install jekyll
  • Get python 3.8 working (I used pyenv)
  • Use pip to install fastai in development mode
  • Use pip to install flask_compress and azureml-core
  • Change into the root of the fastai repository you cloned
  • Run make docs
  • Change into the docs folder that was created and run the jekyll server (bundle exec jekyll serve)

Coding Strip

Abstract

Programming is difficult for some people to learn because the concepts are abstract and while there have been efforts to make them more concrete, efforts that focused either on telling stories (e.g. picture books and adventure comics) or transforming the code into something more tangible (e.g. manipulating physical blocks or using graphic representations to create programs) but these prior works didn't make the step from the concrete systems they created to actual code so this team created and tested a system (Coding Strips) to develop comics that could be directly tied to real code.

Cite

  • Suh S, Lee M, Xia G. Coding strip: A pedagogical tool for teaching and learning programming concepts through comics. In2020 IEEE Symposium on Visual Languages and Human-Centric Computing (VL/HCC) 2020 Aug 10 (pp. 1-10). IEEE.

Coding Comics: Recursion

What Is This?

This is a re-working of the Coding Strip Recursion example. Not because I can do it better, but because I've never done one before so stealing their idea seems like an easier way to start. In the original they had a comic showing a character who wants to buy a ticket but there's a long line so she asks the person in front of her how many people are in front of him, and he asks the person in front of him, and so on. They then followed up the comics with some code that translated the comic to a concrete function.

The Comic

(Coming Soon)

In English-Ish

Forward

To find the length of the line, each person asks the person in front how many people are in front of them.

Base Case

When the person at the front of the line is reached, he reports that there's no one in front of him (zero).

Backwards

Once the front of the line is reached, each person then relays back how many people the person in front reports and adds one to include the person who reported the count until the back of the line is reached.

The Code

Here's some code to illustrate the idea of asking the person in front of you how many people are in front of them and having that question propagate forward and then have the answer propagate back.

A Person

I originally thought of using a list, but then you'd have to criple the length method… so I'm making a linked list of a sorts, where each person knows the person in front of them.

class Person:
    """A person in line
    """
    person_in_front = None

The Recursion

def hey_fella_how_many_people_are_in_front_of_me(fella: Person):
    """Finds out how many people are in front of current person

    Args:
     fella: the current person being asked

    Returns:
     Number of people in front (including last person)
    """
    COUNT_THIS_FELLA = 1    
    if fella.person_in_front is None:
        return COUNT_THIS_FELLA
    return (hey_fella_how_many_people_are_in_front_of_me(fella.person_in_front)
            + COUNT_THIS_FELLA)

Check If It Works

Now I'll create a line of unknown length so we can check it.

from string import ascii_letters
import random

waiting = random.randrange(1, 1000)

def line_of_people(people: int) -> Person:
    """Builds the lengthless line

    Args:
     people: how many people to queue up

    Returns:
     line of people
    """
    line = this_person = Person()
    for person in range(1, waiting):
        this_person.person_in_front = Person()
        this_person = this_person.person_in_front
    return line

in_line = line_of_people(waiting)

So at this point we have a line of people of unknown length. Each person only knows the existence of the person in front of them so there's no way to get the length of the line directly, but we can use the recursive function to find out how many people there are.

reported = hey_fella_how_many_people_are_in_front_of_me(in_line)
print(f"Expected: {waiting}, Actual: {reported}")

assert waiting == reported
Expected: 539, Actual: 539

Seems to be working.