A Mouse Follower

Table of Contents

Middle

let mouse_follower_sketch = function(p) {
    p.setup = function() {
        let parent_div_id = "mouse-follower";
        this.canvas = p.createCanvas($("#" + parent_div_id).outerWidth(true), 800);
        //this.canvas.parent(parent_div_id);
        p.walker = new Walker(p);
    }

    p.draw = function() {
        p.background(255);
        p.walker.walk();
        p.walker.display();
    }
};

function Walker(p) {
    this.position = p.createVector(p.width/2, p.height/2);
    this.velocity = p.createVector(0, 0)

    this.walk = function() {
        mouse = p.createVector(p.mouseX, p.mouseY);
        // calling sub on the vectors does an in-place update
        // using p5.Vector.sub creates a new vector
        // This is a static method so we use the module (p5) not the instance (p)
        acceleration = mouse.sub(this.position);

        // setMag always produces the same magnitude (but the orientation stays the same)
        acceleration.setMag(0.5);
        this.velocity = this.velocity.add(acceleration)
        this.position = this.position.add(this.velocity)
  }

  this.display = function() {
      p.stroke(0);
      p.noFill();
      p.background(255, 255, 255, 25);
      p.ellipse(this.position.x, this.position.y, 48, 48);
  }
}

sketch_container = new p5(mouse_follower_sketch, 'mouse-follower');

End

  1. Shiffman D. The nature of code: simulating natural systems with processing. Version 1.0, generated December 6, 2012. s.l.: Selbstverl.; 2012. 498 p.

p5.js With Org-Mode and Nikola

What Is This, Then?

This is a re-working of a p5js post I made a while ago to see if I could remember how to use it with nikola, my static site generator of choice. Upon revisiting it again I realized that the text was describing how to do it with posts written in restructuredText even though I re-wrote the post in org-mode, and haven't used restructuredText in a while so it didn't really make sense. Additionally, I had assumed since I have the original org source, whenever I want to remember how I had used p5js in org-mode, I could just read it and figure out what I had done - but while that was sort of true, it was harder than I would have liked, so this is going to be a post showing:

  • How to put a p5js sketch into an org-mode post for HTML exporting.
  • How to put multiple p5js sketches on the same page without them conflicting with each other.
  • How to display the javascript for the p5js sketch when it's in a separate file.

This is nikola specific, but I'm assuming it'd be similar if I switched again to another system.

The Short Version

To put a p5.js sketch into an org-mode document:

  • Include the p5 library in a script tag
  • Create an Instance Container to place the sketch somewhere on the page.
  • Create a javascript sketch using Instantiation and associate it with the Instance Container
  • For Nikola, put the javascript sketch in a folder named after the slug of the post (files/posts/<SLUG>/).

The First Sketch

The sketches I'll be using came from Getting Started With Processing. This first one creates a circle that follows your mouse as you move it around.

The HTML Elements

To start we'll create two HTML elements that we want to export as HTML from the org-mode post. One is a script element that imports the javascript for the p5 sketch, the other is a div element which the javascript puts the sketch into (the p5js documentation calls this an Instance Container). Since we want the HTML elements themselves to be in our final HTML document we put in an org-mode export block.

#+begin_export html
  <script language="javascript" type="text/javascript" src='get_started.js'></script>

  <div id="get-started"></div>
#+end_export

Wherever you put that block in the org-mode post is where the p5 sketch will be. I created the sketch in a file called get_started.js so I tell the the script tag to import it with src='get_started.js'. The div id is how the javascript knows where to put the sketch, which I'll go over when we get to the second sketch. The big white space above this paragraph is created because that's where I put the real export block (the one shown above the white space is just for documentation, the real block is hidden) so if you move your cursor over it you should see something happen.

The Javascript

When nikola creates the page from this post it's going to copy over the javascript file ("get_started.js") and put it next to the HTML file for the post, which is why we can just put the file name in the script tag and don't need a path. In order for nikola to find the original file to copy over we need to put it in a folder whose path looks like files/posts/<SLUG>/get_started.js (starting from the root of the nikola repository). You can probably change it but this is the way it works by default.

The <SLUG> has to be the slugified name for the post (for nikola this is set in the slug metadata at the top of the post). In this case I used the much too long slug p5-js-with-org-mode-and-nikola so the path to the javascript file is files/posts/p5-js-with-org-mode-and-nikola/get_started.js.

We need to know this for two reasons:

  • One is that it's where you have to put the file or it won't get copied over when nikola builds the site (you will have to make the folder if you didn't do it previously).
  • The other is that I want to show the javascript itself in this post so we'll put in an org-mode include directive with the path to the file.

The thing that I tend to stumble over when embedding other files into an org-mode post is that the path for the include directive is relative to the location of the org-mode post, not the root of the nikola repository. Since the org-mode file for this post is in a sub-folder named posts, our path needs to go up one directory first, then back down, like this:

#+include: ../files/posts/p5-js-with-org-mode-and-nikola/get_started.js src js

Wherever you put the include directive in the post is where org-mode will insert the contents of the file. The arguments after the path tell org that it's a source block (and not, say, an example) and that it's in javascript so org will apply the right syntax highlighting to it, like so:

function get_started(p5js){
  const WHITE = 255;
  const COLOR = p5js.color(0, 0, 255);
  let diameter;

  p5js.setup = function() {
    let canvas = p5js.createCanvas(0.8 * p5js.windowWidth, 200);
    p5js.background(WHITE);
    p5js.strokeWeight(3);
    p5js.stroke(COLOR);
    p5js.fill(WHITE);
  }; // setup

  p5js.mousePressed = function() {
    p5js.background(COLOR);
  }; // mouse_pressed

  p5js.mouseReleased = function() {
    p5js.background(WHITE);
  }; // mouse_released

  p5js.draw = function() {
    /* Draw circles that change diameter based on mouse speed */
    /* and color based on if mouse-pressed (or not pressed)   */
    if (p5js.mouseIsPressed) {
        p5js.fill(COLOR);
        p5js.stroke(WHITE);
    } else {
        p5js.fill(WHITE);
        p5js.stroke(COLOR);
    }
    diameter = p5js.pow(p5js.dist(p5js.pmouseX, p5js.pmouseY,
                                  p5js.mouseX, p5js.mouseY), 1.5);
    p5js.ellipse(p5js.mouseX, p5js.mouseY, diameter, diameter);
}
}; // get started

new p5(get_started, "get-started");

You don't need to actually show the javascript, and I would normally do it by putting the code in the post itself and then tangling it out, the way I do it for the next sketch, but this is how I did it originally and so this is for the future me that might want to but will probably forget how to do it.
The Second Sketch

This second sketch is also from the "Getting Started With Processing" book and I'm including it to show that the way we're creating the p5 sketches not only specifies the location of the sketch (via the Instance Container) but we're also using what the p5js documentation calls Instance Mode Instantiation to keep the sketches from stomping on each other's variables.

The Sketch Function

If you look at the p5js.org documentation you'll notice that they generally create them using global variables. This works okay if you only have one sketch on your page, but if you have more than one the code from the different sketches might interfere with each other (if you have things with the same name, e.g. setup then the later definitions will replace the earlier ones as the browser loads the page). The way that we keep our sketches from interfering with each other is to create a function for each sketch that takes a p5 object as its argument and then do all the other defining within that function. This first block that we're looking at gives the function declaration for our second sketch and also defines some variables.

let rotate_translate_sketch = function(p5js) {
  const WHITE = 255;
  const COLOR = p5js.color(255, 0, 0);

  let angle = 0.0;
  let side;

Normally I would have called the COLOR constant RED (or BLUE in the case of the first sketch) but I thought it'd be a simple way to show that they're not conflicting with each other - if they were declared globally you would get a syntax error and the sketch wouldn't run, since you're re-declaring a constant. If they were variables instead of constants then you wouldn't get an error but the sketches would end up the same color, with one definition of COLOR overriding the other. This seems like a trivial thing, but it can sometimes create unpredictable conflicts that are hard to troubleshoot and tedious to work around.

Mouse Pressed

I'm not really sure what's going on under the hood, but in order to define behaviors for the p5js methods we have to do what looks like monkey-patching on the p5js object that gets passed in to the sketch function. In this case I want to white-out the sketch whenever the mouse is pressed so I define/re-define the p5js mousePressed function and assign it to the p5js object.

p5js.mousePressed = function() {
  p5js.background(WHITE);
}; // mouse_pressed

Setup and Draw

As with mousePressed, the way to define the setup and draw behaviors for p5js is to create new functions and assign them to the p5js object. Note that in most of the documentation examples the p5js methods are global, but in this case I'm using the methods and attributes associated with the p5js object (e.g. p5js.createCanvas, instead of createCanvas).

p5js.setup = function(){
  p5js.createCanvas(0.8 * p5js.windowWidth, 200);
  p5js.strokeWeight(3);
  p5js.smooth();
}; //setup
  p5js.draw = function(){
    p5js.stroke(COLOR);
    p5js.translate(p5js.mouseX, p5js.mouseY);
    side = p5js.pow(p5js.dist(p5js.pmouseX, p5js.pmouseY,
                              p5js.mouseX, p5js.mouseY), 1.5);
    p5js.rotate(angle);
    p5js.square(-15, -15, side);
    angle += 0.1;
  } // draw
}; // end of rotate_translate_sketch

And that's the end of our sketch function.

Attaching Our Sketch Definition

So now we have our sketch definition, but how do we pass in the p5js object so we can call it? Well, we don't. Instead of calling the function we create a new p5 object, passing in the function in as the first argument and the ID of the div block that we want to put it in as the second argument (I'll create the div afterwards).

new p5(sketch=rotate_translate_sketch, node="rotate-translate");

Now our sketch will get attached to the HTML div block whose ID is "rotate-translate" and run.

The HTML

As with the first sketch, we need to include the javascript file in a script tag (in this case it's rotate_translate.js) and create the div using the ID we passed to the p5 object.

#+begin_export html
<script language="javascript" type="text/javascript" src="rotate_translate.js"></script>

<div id="rotate-translate"></div>
#+end_export

And there you go, two p5js sketches put in an org-mode post and exported to HTML using nikola.

One More Thing

Something I didn't go over is that the p5js library itself has to be pulled into the page so somewhere you need to put an element that looks something like this (assuming it's coming from the CDN):

<script src="https://cdn.jsdelivr.net/npm/p5@1.5.0/lib/p5.js"></script>

In my case I made a template for nikola to do it, but I haven't worked with mako for a while so maybe I'll have to look at that again later.

Sources

  • p5js.org: The site for p5.js.
  • Instantiation: The p5.js example page for keeping variables local to a sketch so sketches don't collide with each other.
  • Instance Container: The p5.js example page for putting a sketch in a specific location (using div tags). It gives several variations of how to do it, I used what I thought was the easiest way.
  • Reas C, Fry B. Getting started with Processing. 1st ed. Beijing ; Sebastopol, [CA]: O’Reilly; 2010. 194 p. (Make: projects).

A Random Accelerator

Table of Contents

Beginning

This is an extension of the random walker with acceleration added.

Middle

let random_accelerator_sketch = function(p) {
    p.setup = function() {
        let parent_div_id = "random-accelerator";
        this.canvas = p.createCanvas($("#" + parent_div_id).outerWidth(true), 800);
        this.canvas.parent(parent_div_id);
        p.walker = new Walker(p);
    }

    p.draw = function() {
        p.background(255);
        p.walker.walk();
        p.walker.display();
    }
};

function Walker(p) {
    this.position = p.createVector(p.width/2, p.height/2);
    this.velocity = p.createVector(0, 0)

    this.walk = function() {
        acceleration = p.createVector(p.random(-1, 1), p.random(-1, 1));
        acceleration = acceleration.mult(0.1)
        this.velocity = this.velocity.add(acceleration)
        this.position = this.position.add(this.velocity)
  }

  this.display = function() {
      p.stroke(0);
      p.noFill();
      p.background(255, 255, 255, 25);
      p.ellipse(this.position.x, this.position.y, 48, 48);
  }
}

sketch_container = new p5(random_accelerator_sketch, 'random-accelerator');

End

This was a very rudimentary walker, the main point of it was that at this point we have the basic kinematic elements to make something following the rules of classical physics (more or less).

  1. Shiffman D. The nature of code: simulating natural systems with processing. Version 1.0, generated December 6, 2012. s.l.: Selbstverl.; 2012. 498 p.

Random Walker Vectorized

Beginning

Another take on getting p5.js to behave using the random walker updated to use a vector for its position.

The Javascript

First we'll write the javascript.

const VECTOR_WALKER_DIV_ID = "random-walker-vectorized";


function random_walker_sketch (p5js) {
  const colors = {
    BLACK: 0,
    WHITE: 255,
    TRANSPARENCY: 50
  }; // colors

  const line_stroke = {
    color: colors.BLACK,
    weight: 4
  }; //line_stroke

  let walker;

  p5js.setup = function() {
    let canvas = p5js.createCanvas($("#" + VECTOR_WALKER_DIV_ID).outerWidth(true), 300);
    canvas.parent(VECTOR_WALKER_DIV_ID);
    walker = new VectorWalker(p5js, line_stroke.color, line_stroke.weight);
  } //setup

  p5js.draw = function() {
    p5js.background(colors.WHITE, colors.TRANSPARENCY);
    walker.walk();
    walker.display();
  } //draw
}; //random_walker_sketch


class VectorWalker {
  constructor(p5js, color, weight){
    this.p5js = p5js;
    this.color = color;
    this.weight = weight;
    this.position = p5js.createVector(p5js.width/2, p5js.height/2);
    } //constructor

  walk() {
    let velocity = this.p5js.createVector(this.p5js.random(-5, 5),
                                                this.p5js.random(-5, 5));
    this.position = this.position.add(velocity);
  }; // walk

  display() {
    this.p5js.stroke(this.color);
    this.p5js.strokeWeight(this.weight);
    this.p5js.noFill();
    this.p5js.ellipse(this.position.x, this.position.y, 48, 48);
  }; // display
} // Walker

new p5(random_walker_sketch, VECTOR_WALKER_DIV_ID);

The Container

Next we need to make a div to contain the javascript. We need to include the javscript itself (in a script tag) and set the div id to something unique ("random-walker-vectorized" in this case). We'll use the div id in the javascript to place the processing sketch inside the div container.

<script language="javascript" type="text/javascript" src='random-walker-vectorized.js'></script>          
<div id="random-walker-vectorized"></div>

A Random Walk(er)

Beginning

This is another post to see if I understand how to get p5.js working in nikola. It's been a while since I tried and I just want to see if I remember how. This uses the random walk example from Daniel Schiffman's book the Nature of Code.

Middle

A Div to Locate the Sketch

The id of this div is set in the p5.js setup function as the parent of the sketch.

<script language="javascript" type="text/javascript" src="walker.js"></script>
<div id="random-walk-container">
</div>

The Javascript

const RANDOM_WALK_DIV_ID = "random-walk-container";


function random_walk_sketch(p5js) {
    const colors = {
      BLACK: 0,
      WHITE: 255,
      TRANSPARENCY: 50
    }; // colors

    const line_stroke = {
      color: colors.BLACK,
      weight: 4
    }; //line_stroke

    p5js.setup = function() {
      let canvas = p5js.createCanvas($("#" + RANDOM_WALK_DIV_ID).outerWidth(true), 300);
      canvas.parent(RANDOM_WALK_DIV_ID);
      p5js.walker = new Walker(p5js, line_stroke.color, line_stroke.weight);
    }; //sketch

    p5js.draw = function() {
      p5js.background(colors.WHITE, colors.TRANSPARENCY);
      p5js.walker.walk();
      p5js.walker.display();
    }; // draw
}; // random_walk_sketch


class Walker {
  constructor(p5js, color, weight, width=48, height=48) {
    this.p5js = p5js;
    this.color = color;
    this.weight = weight;
    this.width = width;
    this.height = height;
    this.x = p5js.width/2;
    this.y = p5js.height/2;
  } //constructor

  walk() {
    this.x = this.x + this.p5js.random(-1, 1) * 10;
    this.y = this.y + this.p5js.random(-1, 1) * 10;
  }

  display() {
    this.p5js.stroke(this.color);
    this.p5js.strokeWeight(this.weight);
    this.p5js.noFill();
    this.p5js.ellipse(this.x, this.y, this.width, this.height);
  }
}

new p5(random_walk_sketch, RANDOM_WALK_DIV_ID);

End

As always, this was way harder than it should have been.

Moving BeyondPod Files To the SDCard (Android 9)

Introduction

I don't follow the changes going on with Android closely enough to know exactly when all the changes were made to disable moving things to the SD Card, but I've been running out of storage recently, even though my SD Card has over 60 GB of free space so I looked into it and there are currently three things that seem to have changed that caused this problem with my Moto-X running Android Pie (9):

  • The option to use the SDCard as an extention of the Internal Storage has disappeared from the storage options.
  • The option to move any of my apps to the SDCard has disappeared from the Apps' settings
  • The last update seems to have broken all the connections between my apps and the SDCard so none of them are (were) using the external storage

There might be a way to get around the first two problems, but I don't really feel like chasing that right now. It turns out that fixing the last case for some of my apps works, but isn't as intuitive as I would like it to be. Here's what to do.

Give Your App Storage Permissions

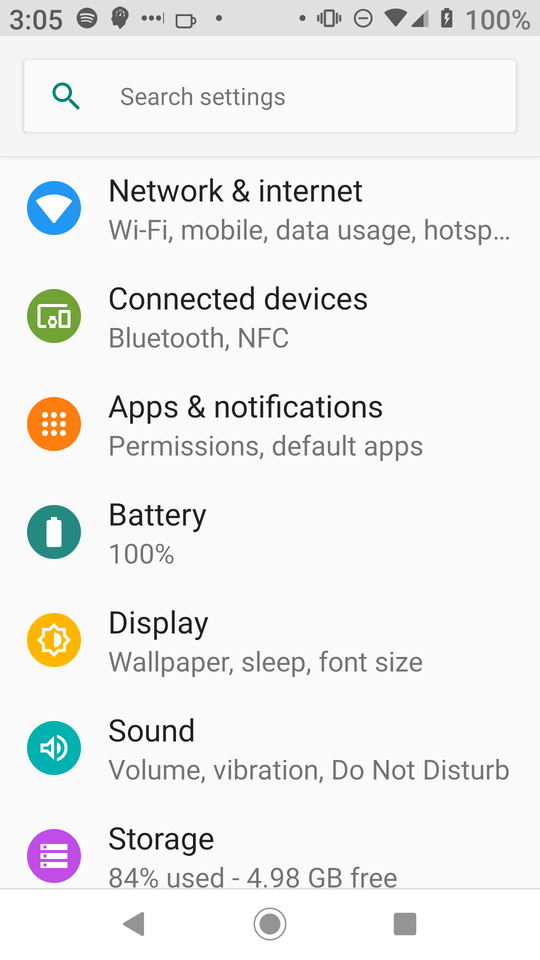
Settings

In your Android settings menu pick "Apps & notifications".

nil

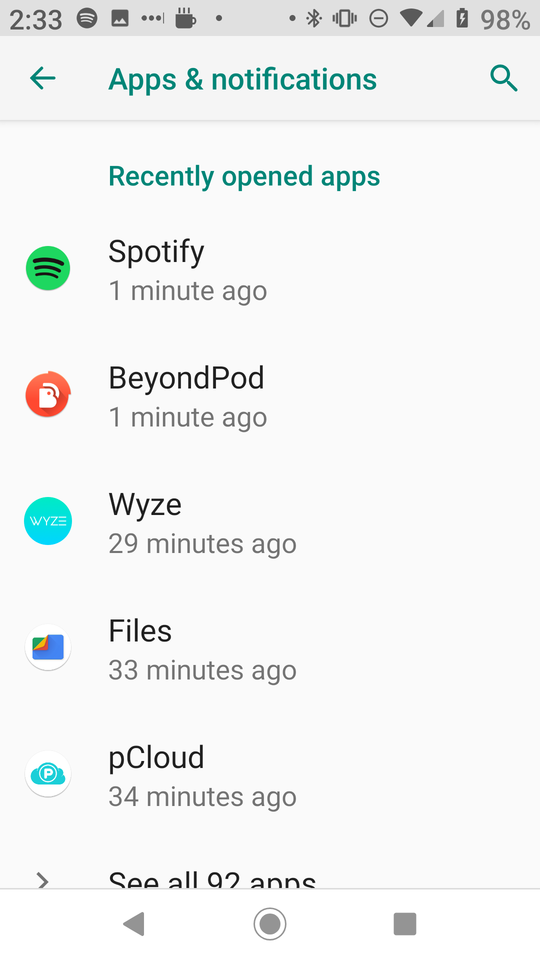
Apps & Notifications

Next pick Beyond Pod from the list of applications (in this case it was one of my recently opened applications, but it isn't always).

nil

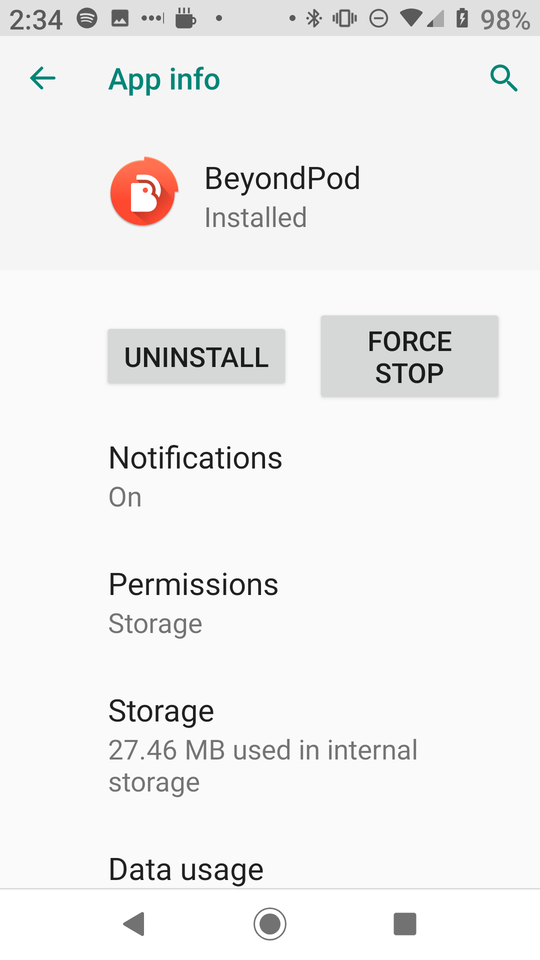
App Info

In the BeyondPod settings make sure that Permissions has Storage listed, if not tap the Permissions to get to that setting.

nil

App Permissions

In the "App permissions" make sure the switch next to "Storage" is turned on.

nil

Figure Out The Path To Your SDCard

Using ADB

I couldn't any way to find out the path to the sdcard in the Android settings themselves. The easiest way (to me) is to set up android debug bridge and then list the contents of the storage folder.

hades@erebus ~/d/datasets [1]> adb shell
payton_sprout:/ $ ls /storage/
ls: /storage//193D-4160: Permission denied
56DC-7D9D emulated self 
payton_sprout:/ $ df -h storage/56DC-7D9D/
Filesystem              Size  Used Avail Use% Mounted on
/mnt/media_rw/56DC-7D9D  60G  3.5G   56G   7% /storage/56DC-7D9D

The Wrong Way

If you look at the permissions for the folder you can see that the folder itself has read-write permissions if you're root or part of the sdcard_sw group

payton_sprout:/ $ ls -l storage/56DC-7D9D/
ls: storage/56DC-7D9D//.android_secure: Permission denied
total 128
drwxrwx--x 3 root sdcard_rw 131072 2019-01-27 14:04 Android

and although there is that Permission denied for the .android_secure file, it let me create folders and files in there so I figured I would create a folder for downloads and point BeyondPod to it.

It turns out that this doesn't work. I was going to walk through the error but I've already set it up the right way and I don't want to undo it. The key to figuring out why it kept telling me my folder didn't exist or was read only was finding this beyondpod forums thread. It looks like when you give permission to BeyondPod to use the SDCard, Android creates a specific folder that BeyondPod can use and you have to point it there. The format is:

/storage/<sd card>/d/data/mobi.beyondpod/files/

So in my case the path is:

/storage/56DC-7D9D/Android/data/mobi.beyondpod/files/

Using "Files" Instead of ADB

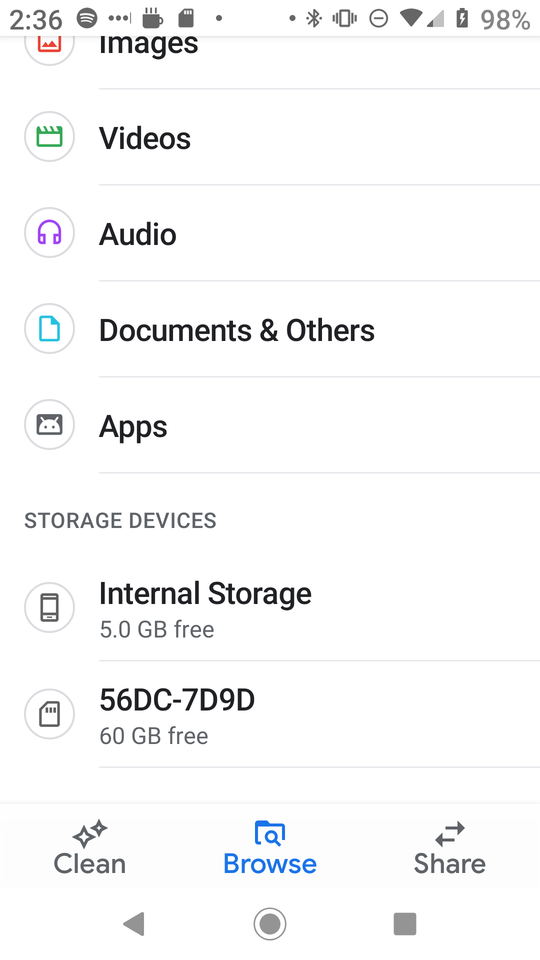
Even though the Settings menus don't seem to show you the path to the sdcard you can use a file browser app if you don't want to use adb. Here's my sdcards name in the files app (it's not a file browser, but it's rather something that's supposed to help you clean up your storage but it works for this case).

nil

Last Step: Point Beyond Pod To the SDCard

Settings

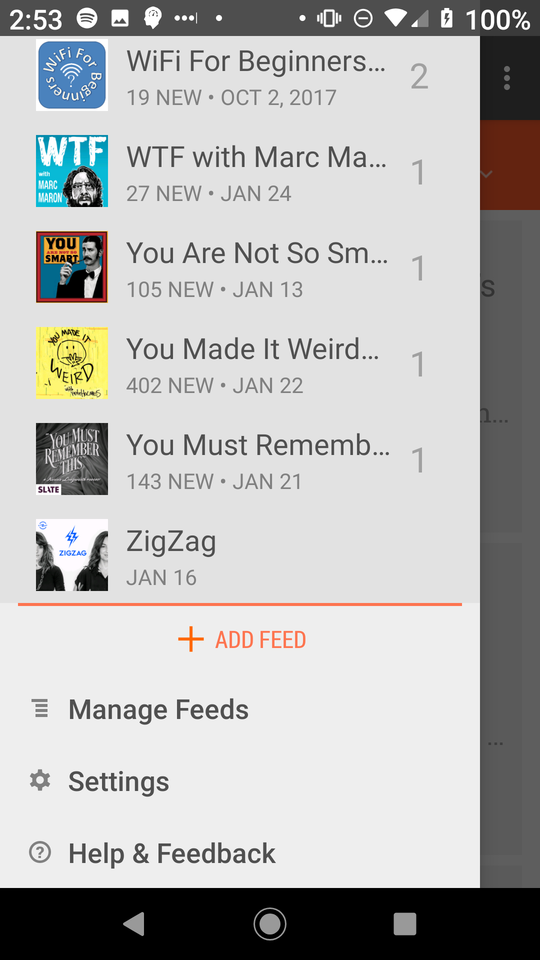
Open Beyond Pod and scroll to the bottom feeds list and tap on the Settings option.

nil

Advanced Settings

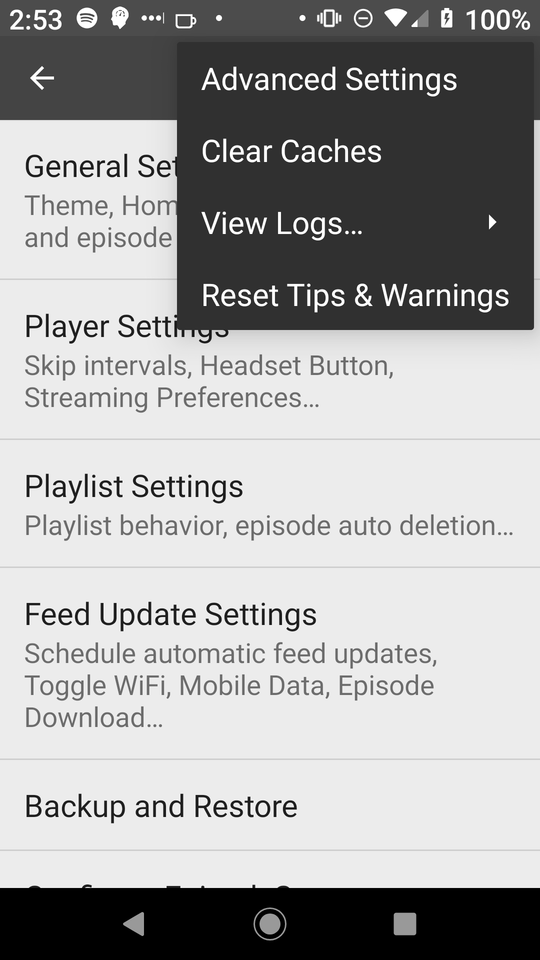
Now click on the hamburger menu icon on the top right to open it up and tap on Advanced Settings.

nil

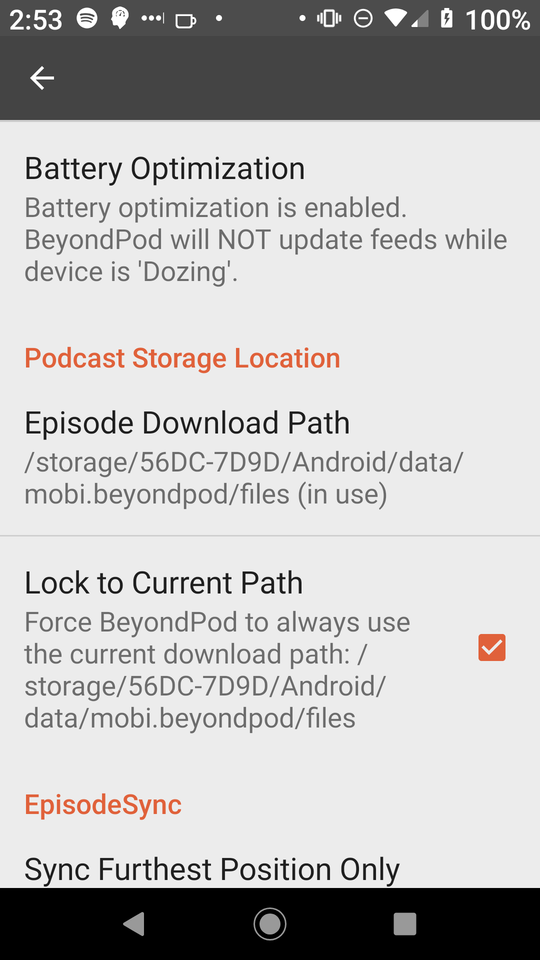
Podcast Storage Location

Scroll all the way down until you reach the Podcast Storage Location section and tap on Episode Download Path to enter the folder path. You should probably also click Lock to Current Path as well.

nil

Once you change the settings BeyondPod will move the files and restart and at this point it should be storing everything to the SDCard. Now, on to all the other apps in there.

pyLDAvis In org-mode With JQuery

Introduction

In my last post I loaded the pyLDAvis widget by dumping the HTML/Javascript right into the org-mode document. The problem with doing this is that the document has a lot of lines of text in it, which slows down emacs a noticeable amount, making it hard to display one widget, and pretty much impractical to show more than one. So, since Nikola (or maybe bootstrap or one of the other plugins I'm using) is loading JQuery anyway, I'm going to use javascript to add the HTML after it loads from a file.

Imports

Python

datetime is just to show how long things take. In this case the data-set is fairly small so it doesn't take very long, but in other cases it might take a very long time to build the LDA model so I like to time it so I know the next time about how long I should wait.

from datetime import datetime
from pathlib import Path

From PyPi

from sklearn.datasets import fetch_20newsgroups
from sklearn.decomposition import LatentDirichletAllocation
from sklearn.feature_extraction.text import CountVectorizer
import pyLDAvis
import pyLDAvis.sklearn

The Data

I'm going to use the Twenty Newsgroups data-set, not because of anything significant, but because sklearn has a downloader for it so I figured it'd be easiest.

path = Path("~/datasets/newsgroups/").expanduser()
newsgroups = fetch_20newsgroups(data_home=path, subset="train")
print(path)
/home/brunhilde/datasets/newsgroups

The newsgroups.data is a list, so it doesn't have a shape attribute like it would it it were a numpy array.

print("{:,}".format(len(newsgroups.data)))
print("{:.2f}".format(len(newsgroups.data)/18000))
11,314
0.63

The documentation for the fetch_20newsgroups function says that the full dataset has 18,000 entries, so we have about 63% of the full set.

The Vectorizer

I'm going to use sklearn's CountVectorizer to convert the newsgroups documents to arrays of token counts. This is about the visualization, not making an accurate model so I'm going to use the built-in tokenizer. I'm not sure what the fit method is for, but the fit_transform method returns the document-term matrix that we need (each row represents a document, the columns are the tokens, and the cells hold the counts for each token in the document).

started = datetime.now()
vectorizer = CountVectorizer(stop_words="english")
document_term_matrix = vectorizer.fit_transform(newsgroups.data)
print("Elapsed: {}".format(datetime.now() - started))
Elapsed: 0:00:03.033235

The LDA

Now we'll build the Latent Dirichlet Allocation Model.

start = datetime.now()
topics = len(newsgroups.target_names)
lda = LatentDirichletAllocation(topics)
lda.fit(document_term_matrix)
print("Elapsed: {}".format(datetime.now() - start))
Elapsed: 0:02:37.479097

PyLDAvis

Okay so here's where we try and get pyLDAvis into this thing.

Prepare the Data for the Visualization

The Prepared Data

The first step in using pyLDAvis is to create a PreparedData named-tuple using the prepare function.

start = datetime.now()
prepared_data = pyLDAvis.sklearn.prepare(lda, document_term_matrix, vectorizer)
print("Elapsed: {}".format(datetime.now() - start))
Elapsed: 0:00:34.293668

Build the HTML

Now we can create an HTML fragment using the prepared_data function. The output is a string of HTML script, style, and div tags. It adds the entire data-set as a javascript object so the more data you have, the longer the string will be.

div_id = "pyldavis-in-org-mode"
html = pyLDAvis.prepared_data_to_html(prepared_data,
                                      template_type="simple",
                                      visid=div_id)

Export the HTML

Now I'm going to save the html to a file so we can load it later.

slug = "pyldavis-in-org-mode-with-jquery"
posts = Path("../files/posts/")
folder = posts.joinpath(slug)
filename = "pyldavis_fragment.html"
if not folder.is_dir():
    folder.mkdir()

output = folder.joinpath(filename)
output.write_text(html)
assert output.is_file()

So here's where we create the HTML that will be embedded in this post. The JQuery load function puts the content of our saved file into the div. I added the css call because I have my site's font-size set to extra-large, since the Goudy Bookstyle looks too small to me otherwise (I think nice fonts look better when they're big), which causes the buttons in the pyLDAvis widget to overflow out of the header. Under normal circumstances you wouldn't need to do this, but if you do want to do any one-off styling, here's an example of how to do it. Otherwise maybe an update to the style-sheet would be better.

The right-hand box is still messed up, but it's good enough for this example.

print('''#+BEGIN_EXPORT html
<div id="{0}"></div>
<script>
$("#{0}").load("{1}")
$("#{0}-top").css("font-size", "large")
</script>
#+END_EXPORT'''.format(div_id, filename))

Slip Box System Parts List

The Four Parts

A Capture System

This should be paper-based, or at least something that's always there and quick to use.

  • a notebook
  • index cards
  • loose paper
  • napkins…

A Reference System

This is where you put information about your sources. For books and papers Zotero is handy, although once again, the fact that I have to fire up this GUI-based program adds a little bit of overhead. The original system was just another box so I'm going to try something like that. Maybe a sub-folder…

The Slip Box

The original system was a wooden box with A6 paper. I'm using a static site with plain text (org-mode).

Something To Produce a Final Product

The system is aimed at writers, but I'm a computer programmer, and I think it might work with other types of output (like drawing) so it's really just having a way to produce something from your project.

Related Posts

Reference

  • HTTSN - How To Take Smart Notes

Using Your Slip Box

Introduction

This is my re-wording of the Slip Box Method.

The Method

Capture Everything

Write everything down - ideas don't count until they're out of your head and on paper. Writing it down also frees your mind to move on to other things.

Take Notes

Whenever you are taking in someone else's ideas (e.g. reading, listening) take notes.

Make Your Notes Permanent

The initial notes are just temporary inputs, later in the day you need to convert them into some form that has these attributes:

  • They are complete - write them for your future self, don't rely on being able to remember what else is needed to understand the note.
  • They are written in a way that relates to your interests.
  • There is only one idea per note.

Put the Permanent Notes in the Slip Box

  • When you file your note look through the other notes and try and place it behind a related note.
  • Add links to other notes that are related.
  • Add the new note to an entry-point note that holds links to other notes.

Work Bottoms-Up

  • Don't try and come up with a project by "thinking", look through the slip box and let it tell you what you're interested in.
  • If you have an idea for what to do but there isn't enough in the box yet, take more notes.
  • Keep the notes in one folder - don't sort them into sub-categories. This way you can make new associations that you didn't have when you first made the note.

Build Projects From Copies

Copy everything that seems relevant to a project folder on your desktop and see what needs to be filled in and what seems redundant (or maybe just wrong).

Translate Your Notes

Take these fragmented notes and convert them into a coherent argument. If you can't then look to take more notes to fill in what's missing.

Revise

Don't accept the first draft, edit, erase, re-do.

Move On

When you're done with the project, start over with a new one.

Implementation Details

The original method used paper and a wooden box. I really like paper and am tempted to try this, but I don't think doing something that makes me even more if a pack-rat is a good idea. The book (How To Take Smart Notes) recommends a computer program written specifically for this system, but I am a little leery of getting tied into one program, and all these GUI programs are starting to turn me off.

Instead, I'm going to try and use this blog as my slip-box, so, as far as "equipment" goes, this is what I'm going to use:

Flattening out the file-system makes it hard to browse the files, though. I guess less and ls are going to be the main thing I use (and maybe ag and deft). We'll see, I only started reading the book yesterday so I'm still trying to figure this out as I go.

Related Posts

Reference

  • HTTSN - How To Take Smart Notes