Cucumber and ECMA Script Modules (ESM) In a Nikola Post

What Is This, Then?

This is a re-do of the cucumber.js example testing for JavaScript/ECMAScript Modules (ESM). Just copying the files exactly as they're given in the cucumber.js GitHub repository works pretty much without problem, but since I'm doing this messy thing with writing JavaScript in these blog posts instead of as part of a code-project, it took a little more work than I would have liked.

I had previously tried to get ESM modules to work with mocha but gave up and went back to using the CommonJS syntax instead (which I just read is meant to work outside the browser and not in it, which explains some of the trouble I ran into). This time I seem to have gotten the ESM style of modules working with cucumber.js, but it \(\textit{is}\) a bit convoluted and maybe not really a good idea to do it this way. So here we go.

Setting Up

The cucumber.js page has instructions on installing it, so I won't go over it. It's mostly just npm install cucumber --save-dev. I seem to remember that they said somewhere not to install it globally, but I can't remember now where I saw it. Once I installed it, I had to edit a couple of files to get it working the way I wanted it to.

The Cucumber.js Configuration

cucumber.js uses a configuration file named… cucumber.js that you put where you run the tests. I'm going to put cucumber test-files into folders whose names will have the form test-<slug>, where slug is the slug for the post where I define the JavaScript and tests in, so in order to get cucumber to find them, I need to change the glob in the import line to match.

export default {
    import: ['test*/**/*.js'],
    publishQuiet: true
}

This file is using the ESM syntax (using an export statement) instead of the CJS form of setting module.export. We're going to have to make all the code match the ESM form, mixing and matching causes cucumber to crash throwing errors saying it was expecting an ESM module.

The Testing package.json

Next we need a package.json file next to the cucumber.js file. There's two changes I made.

  • "type": "module" tells cucumber (or node?) that we'll be using ESM, not CJS
  • I'm running it with nodemon so the "test" attribute gets the command to run and its arguments.
{
  "type": "module",
  "private": true,
  "scripts": {
    "test": "nodemon --watch . --exec cucumber-js ./test*"
  },
  "devDependencies": {
    "@cucumber/cucumber": "^9.1.2",
    "chai": "^4.3.7"
  }
}

I had previously installed chai globally and it was working with mocha but for mysterious reasons this time I got a "Module not found" error (maybe because I installed cucumber locally) so I installed it locally too.

So far, these are the files that I've edited in the testing directory.

cucumber.js
package.json

There's also a package-lock.json and node_modules/ which were created as part of installing cucumber and chai but I don't touch those.

Now that we have this setup we can run the test-runner using npm.

npm test

Cucumber runs once and then will re-run the testing every time we make a change to our files. I'm not sure how the magic gets done but it even detects when I make changes to the JavaScript being tested after I moved it outside of the testing folder.

The Test Files

The slug for this post is cucumber-and-ecma-script-modules-esm so the testing files are going into a folder named test-cucumber-and-ecma-script-modules-esm which sits next to the cucumber.js files and the package.json files that I just mentioned.

The Feature File

We're going to make a Greeter class that does one thing: greets users. Cucumber will look for files that have the .feature file extension and parse the keywords to figure out what tests to expect. Here's the one for our greeter (in the file greetings.feature).

Feature: Greeting

Scenario: The Greeter Greets

Given a greeter
When the greeter greets me
Then I should hear "Go away."

The Test Steps

Now that we have a feature file we have to write the tests that match it. In our feature file we used three special keywords - Given, When and Then - which have to match functions in our test file to pass the cucumber tests, which I'll put in a file called steps.js. In the example code they put it in a folder named steps, which makes sense if you have more than one folder but this'll do for now.

The Imports

These are the ESM style imports. The Greeter import statement is long because it's in a file accessible to this post rather than being next to the test-code so I have to pass in the path relative to where the steps.js file is.

import { expect } from "chai";
import { Given, When, Then } from "@cucumber/cucumber";
import { Greeter } from  "../../../files/posts/cucumber-and-ecma-script-modules-esm/greetings.js";

Given

Our given function just creates a Greeter instance. There are also functions like Before and BeforeAll that let you do something once before each Scenario (or all Scenarios), but we only have one scenario and it sounds clearer to me to say "Given a greeter…".

Given("a greeter", function() {
  this.greeter = new Greeter();
});

When

Our when calls the greetings method and saves the output so we can check it in our Then function.

When("the greeter greets me", function () {
  this.is_what_i_heard = this.greeter.greetings();
});

Then

Our last function is interesting in that it uses what they call cucumber-expressions, which allow you to put types into the string definition to tell it what to look for in the feature definition so we don't have to set the exact value. In this case our feature file says Then I should hear "Go away." The end of the statement is in quotes so cucumber knows that it's a string so we can replace it with {string} when we define the function and cucumber will pass in the expected string as an argument to the function that we pass to the Then function. Then we can use the passed-in value rather than hard-coding the expected string into our test. In this case the parameter what_he_should_have_said will have the string "Go away." in it, extracted (without the quotes) from our feature file definition.

Then("I should hear {string}",
  function (what_he_should_have_said) {
    expect(this.is_what_i_heard).to.equal(what_he_should_have_said);
  }
);

So far this is the basic structure of our testing folder (ignoring othe stuff that I didn't create or edit).

cucumber.js
package.json
test-cucumber-and-ecma-script-modules-esm/
  greetings.feature
  steps.js

The Greeter

Based on our test, this is what our Greeter class should look like.

nil

Now let's define the Greeter (the software under test). Initially, just to see if it worked, I put it next to the test files the way that the example did, but the point of this is to get the JavaScript into the post so we can work with P5, so its final resting place is in a file named greetings.js in the folder where Nikola will look for files when I build the site.

class Greeter {
    greetings() {
        return "Go away.";
    }
}

export { Greeter };

In order for the class-definition (or anything else we define) to be importable elsewhere we have to declare it exportable. In the example code they used the syntax:

export class Greeter {

when defining the class, but, as seems to be the way with JavaScript, there's multiple ways to do exports (and imports), each of which probably has some subtle different use, but which is more than I want to know about at this point, so I decided to settle on this syntax:

export { Greeter };

(making a separate export line at the bottom of the file) for two reasons:

  • If you have multiple things to export you can put them all in the curly braces so it's in one statement instead of scattered around the file
  • This leaves class definitions looking the same as they did before I decided to try messing with modules.

The Greeter package.json

This next bit took me a while to figure out. If you put the Greeter definition into a sub-folder below where we're running the tests, it will recognize our greeter.js file as an ESM module just fine. But, if you move it into a folder outside our tests as I did, node (or cucumber) suddenly won't be able to tell that it's an ESM module.

The error message will helpfully tell you to change the file extension from .js to .mjs, which doesn't work, and offer you a different import syntax to use, which also doesn't work, and to tell you to put "type": "module" into the package.json file… which turns out to sort of be the answer.

If you look at the package.json I edited in the section above to run the tests you'll see that it already has the "type": "module" line in it, which I assume is why the tests were running before I moved greetings.js. But it turns out that to get the tests to recognize the greetings.js file as an ESM module once I moved it I also had to put a package.json file next to it that identified it as an ESM module. Like so:

{
  "type": "module",
  "private": true
}

I suppose, maybe it's a little like an __init__.py file in python that tells python to recognize a folder as a module (package?). Or maybe not. Anyway, going now and looking at the output of the tests - Hokey Shmokes, Bullwinkle! It works!

Now the Other Hard Part

Okay, so the testing is working now, but just running tests is sort of meaningless (no offense to testers), the real point of it all is to get the tested JavaScript back into this post and use it.

First Let's Setup the Sketch Tag

According to Mozilla, <script> tags are assumed to be JavaScript if you don't set a MIME type (and so they tell you not to set the type argument if it's a regular script) but to let the browser know it's a module you have to set the attribute type="module" in the tag. I'm going to use a convoluted name for the actual p5 sketch file that I'm making, but for demonstration's sake let's pretend it's called sketch.js, then the HTML tag to include it in this post would look like this.

<script src="sketch.js" type="module"></script>

The Greeter class is going to be imported into our sketch module so we don't refer to it in the HTML.

Now Let's Use It

We'll import the Greeter into the sketch, setup the canvas, and then display the greeter's greetings on the canvas.

const GREETINGS_DIV = "db4ce169-greetings-sketch";

import { Greeter } from "./greetings.js"

function greetings_sketch(p5js) {
  p5js.setup = function() {
    p5js.createCanvas(175, 50);
    p5js.background("gainsboro");
    p5js.textSize(32);
    p5js.fill(0, 103, 153);
    let peter_the_greeter_says = new Greeter();    
    p5js.text(peter_the_greeter_says.greetings(), 10, 30);
    p5js.noLoop();
  };// setup
}; // greetings_sketch

new p5(greetings_sketch, GREETINGS_DIV);

And now, here's the sketch.

Impressed?

Just for completeness, the folder with the code for the post has these files in it.

greeter.js
sketch.js
package.json

What Have We Learned?

This was an exercise in seeing if I could get cucumber.js and ESM modules working. In particular it was about testing code that gets included in this post and used by p5. This was a pretty simple example, but it seems to work so I'll take it as a start that I can reference when going back to work with more complex p5 code.

Links

These are (mostly) referred to in the body of the post, and the body also has links not in here, but for future reference, this should be enough to get back up to speed.

Testing P5 with Mocha and Chai

What This Is

This is a walk-through of the test-driven development example on the p5js site. The color changing square above is created by exhaustively stepping through the RGB values for a p5 color. The site documentation doesn't seem to tell you the name of the color array attribute so you can access it, instead it tells you to use setter methods, but the tutorial indicates that the array is stored as an attribute of the color object named levels so we'll be working with that to change the colors.

Setting Up the Tests

Running the Tests

To run the tests I'll use three things:

  • mocha: the framework to define the tests
  • nodemon: a program that watches our code and re-runs mocha if something changes
  • npm: the node-package-manager which will run nodemon to run mocha

npm comes with and works with node so I guess we really need four things.

To run the tests I created a package.json file which points to the folder with the test code in it (or any folder next to the package.json file whose name starts with test).

{
  "scripts": {
    "test": "nodemon --watch . --exec 'mocha ./test* || true'"
  }
}

Weirdly, the mocha Getting Started documentation has an example package.json snippet to run mocha which doesn't put curly braces outside of the "scripts" attribute, but this will cause npm to throw an error saying that it isn't valid JSON. Maybe they figure you'd just know it. Or maybe they expect that you'd install mocha locally so there'd be an existing package.json that you just have to edit. Anyway, to run the tests I go into the folder above the test-folder and run npm like this:

npm test

Writing the Test File

Put It In Strict Mode

Javascript can be pretty lenient about letting what might be considered mistakes pass through without raising an error. I'll put the test-code into Strict Mode, making our mistakes more evident, hopefully, by putting this line at the top of the test.js file:

"use strict";

Import Chai and Sinon

I'm going to use the Behavior-Driven Development (BDD) version of Chai to make our assertions about what we expect the code to be doing.

const expect = require("chai").expect;

I'm also going to stub some methods using sinon.

const sinon = require("sinon");

Note: I originally had the ColorIncreaser class that I'm going to test in the same file as the sketch which caused an error because the sketch refers to a p5 object that gets pulled in from a CDN by an HTML tag. I later decided to move it into its own file so there's no longer a need to mock p5, but if you ever need to do it you can add this line before importing anything from the sketch file:

global.p5 = sinon.stub();

Import the Color Increaser Class

We're going to create a ColorIncreaser class which we need to import into the test code. Our import is going to look a little funky, though, because the sketch is in a folder created for this post.

  • files/posts/bdd-testing-p5/

But the test-code is in a different folder.

  • tests/mocha-tests/test-bdd-testing-p5/

This folder sits next to the files folder. So our test code has to go up two levels and then back down into the files to get the sketch code.

const ColorIncreaser = require('../../../files/posts/bdd-testing-p5/color-increaser');

Note that the path is relative to where the javascript file with the tests is, not where I'm running mocha. Also, although it looks like a file reference, the file is called color-increaser.js, but we're treating it as a module so we don't put the file extension on it.

Also, in order to be able to import the class we need to set it as exportable in the file where the class is defined - but I'll show that after the class is defined.

The Whole Code Module

Since this is about coding test-driven I'm going to show the tests and then the implementation that gets written to pass the test. This makes it kind of disorienting to read so I thought I'd show the entire color-increaser.js file that's being created here exactly as it ends up once it's all done.

const CHANNELS = {
  RED: 0,
  GREEN: 1,
  BLUE: 2,
  ALPHA: 3,
  MAXIMUM: 255,
  MINIMUM: 0
};

class ColorIncreaser {
  constructor(color_increment, color) {
    this.color_increment = color_increment;
    this.color = color;
  }// end constructor

  increase() {
    this.color.levels[CHANNELS.RED] += this.color_increment;

    if (this.color.levels[CHANNELS.RED] > CHANNELS.MAXIMUM) {
      this.color.levels[CHANNELS.RED] = CHANNELS.MINIMUM;
      this.color.levels[CHANNELS.GREEN] += this.color_increment;
    };

    if (this.color.levels[CHANNELS.GREEN] > CHANNELS.MAXIMUM) {
      this.color.levels[CHANNELS.GREEN] = CHANNELS.MINIMUM;
      this.color.levels[CHANNELS.BLUE] += this.color_increment;
    };

    if (this.color.levels[CHANNELS.BLUE] > CHANNELS.MAXIMUM) {
      this.color.levels[CHANNELS.BLUE] = CHANNELS.MINIMUM;
    };
  } // end increase

  next() {
    this.increase();
    return this.color;
  };  //end next
}; // end ColorIncreaser

if (typeof module != "undefined") {
  module.exports = ColorIncreaser;
};

Channel Constants

I have a tendency to flip values around (sometimes it seems like blue should come before green, for example) so I like to create objects to hold values that get used repeatedly. This at the top of the same module as the Color Increaser class.

const CHANNELS = {
  RED: 0,
  GREEN: 1,
  BLUE: 2,
  ALPHA: 3,
  MAXIMUM: 255,
  MINIMUM: 0
};

Testing and Implementing the Color Increaser

Now we'll write the tests and implement the ColorIncreaser class along with it.

Mock Color

We don't want to use any p5 objects in the testing so we'll make a fake color object, implementing its undocumented (as far as I can tell) levels attribute as an Array.

class MockColor {
  constructor(red, green, blue, alpha){
    this.levels = [
      red,
      green,
      blue,
      alpha
      ]
  } // end constructor
 }// end mock_color

Setting Up the Tests

mocha's describe function acts like a header around our tests. Within it I'm setting some constants and also defining a beforeEach function which will create a new ColorIncreaser object before running each test so it won't have any changes we make in the other tests spilling over. Although I could import the CHANNELS object with the constants I thought it'd be a better check to create a new set to double-check what's going on in the code being tested.

describe('Given the ColorIncreaser class definition', function() {
  const [RGB_MIN, RGB_MAX ]= [0, 255];
  const [RED, GREEN, BLUE, ALPHA] = [0, 1, 2, 3];
  const CHANNELS = [RED, GREEN, BLUE, ALPHA];
  const COLOR_INCREMENT = 1;

  let color_increaser;
  let color_mock;

  beforeEach(function() {
    color_mock = new MockColor(RGB_MIN, RGB_MIN,
                               RGB_MIN, RGB_MAX);
    color_increaser = new ColorIncreaser(COLOR_INCREMENT,
                                         color_mock);
  });

Does the ColorIncreaser Exist?

Our first test makes sure that we were able to create the ColorIncreaser object. This is actually a little bit of a fake because the beforeEach will fail if we can't create the object and it won't actually reach this test. I suppose you could still break it by making a function named ColorIncreaser instead of a class so this acts as an extra check.

First we make a section header to make it a little clearer (it doesn't actually affect the tests, just the output after the test is run).

describe("When the ColorIncreaser is constructed",
          function() {

And then the actual test to see if the constructor created an object.

it ("Then it should be an object", function(done) {
  expect(color_increaser).to.be.a('object');
  done();
});

Mocha will run the tests asynchronously (parallel and out of order) so we need to accept the done function and then call it when the test is finished so mocha knows that the test is done.

The ColorIncreaser Class

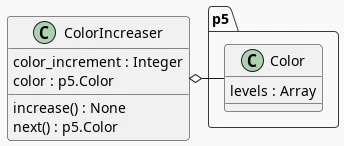
Now that we have the test I'll define the class and its constructor. It's a pretty basic class, here's a class diagram of its attributes.

Color Increaser class diagram

And here's the class and constructor definition.

class ColorIncreaser {
  constructor(color_increment, color) {
    this.color_increment = color_increment;
    this.color = color;
  }// end constructor

Does it take an increment amount?

This is just a sanity check to make sure that the constructor actually saved the increment amount we passed in.

it("And it should set the color_increment",
   function(done){
     expect(color_increaser.color_increment).to.equal(COLOR_INCREMENT);
     done();
   });

Does it take a color?

This is another check to make sure the constructor saved the color object that got passed in. I couldn't find a same-object checker in chai but the eql is described as a check that the objects are "deeply-equal" which I assume is the same thing.

it("And set the color attribute",
  function(done){
    expect(color_increaser.color).to.be.eql(color_mock);
    done();
  });

The Increaser

We're going to implement a method for the ColorIncreaser that will increment the color-array so let's check that it works. It sort of treats the three color channels (Red, Green, and Blue… we'll pretend Alpha doesn't exist) like a three-digit number using base 255 instead of 10 and with the digits being BGR. So we start with all three channels at 0, then we increment red from 0 to 255 and when it hits 256 we set it back to 0 and set green to 1, then we repeat this over and over until green goes up to 256 at which point we reset both red and green to 0 and set blue to 1 and so on.

I'll add a describe section to the tests to make it clearer where testing this method starts.

describe("And when the increase() method is called", function() {

Does the red channel increase?

Until it increments the red channel past 255 the other channels don't change so we'll first test that only the red channel changes up until that point.

it ("Then it should increment red up until 255",
    function(done){
      for (let count=RGB_MIN; count < RGB_MAX; count +=1) {
        color_increaser.increase();
      }
      let expected = [RGB_MAX, RGB_MIN, RGB_MIN, RGB_MAX]

      CHANNELS.forEach((channel, index) => expect(
        color_increaser.color.levels[channel]).to.equal(expected[index]));

      done();
    });

The Color-Increaser Method

So now I'll add the increase method to the ColorIncreaser class which adds the color_increment to the red-channel when it's called.

increase() {
  this.color.levels[CHANNELS.RED] += this.color_increment;

Does it wrap red back to 255 when it hits 256?

The channels can only go up to 255 so once we hit 256:

  • red wraps back to 0
  • green increments one

The tutorial uses for-loops to actually step through and increment the color until it passes the limit but I'll cheat and just set the red-channel to the limit and then increment it.

These are our expected values before and after the call to increase.

Channel Before Increase After Increase
Red 255 0
Green 0 1
Blue 0 0
Alpha 255 255
it ("But red should wrap-around to 0 when it hits 256 and increment green",
    function(done) {
      color_increaser.color.levels[RED] = RGB_MAX;
      color_increaser.increase();
      let expected = [RGB_MIN, COLOR_INCREMENT,
                      RGB_MIN, RGB_MAX];
      CHANNELS.forEach((channel, index) => expect(
        color_increaser.color.levels[channel]).to.equal(expected[index]));
      done();
    });

The Wrap-Red Conditional

Within the increase method we add this little chunk after incrementing the red channel.

if (this.color.levels[CHANNELS.RED] > CHANNELS.MAXIMUM) {
  this.color.levels[CHANNELS.RED] = CHANNELS.MINIMUM;
  this.color.levels[CHANNELS.GREEN] += this.color_increment;
};

Does Green Wrap Too?

As with red, the green channel can only go up to 255 so once we increase green to 256:

  • wrap green back to 0
  • increment blue

Also, since we only increment green if red hits 256 it wraps back to 0 too. Once again, I'm forgoing looping and incrementing and instead just setting the red and green channels to their limits and then calling increase.

These are our expected values before and after the call to increase.

Channel Before Increase After Increase
Red 255 0
Green 255 0
Blue 0 1
Alpha 255 255
it("And it should wrap-around green and increase blue if green exceeds 255",
   function(done) {
     color_increaser.color.levels[RED] = RGB_MAX;
     color_increaser.color.levels[GREEN] = RGB_MAX;

     color_increaser.increase();

     let expected = [RGB_MIN, RGB_MIN,
                     COLOR_INCREMENT, RGB_MAX];

      CHANNELS.forEach((channel, index) => expect(
        color_increaser.color.levels[channel]).to.equal(
          expected[index]));
    done();
   });

The Wrap-Green Conditional

Now within the increase method we add this little chunk after incrementing the red channel to check the green channel.

if (this.color.levels[CHANNELS.GREEN] > CHANNELS.MAXIMUM) {
  this.color.levels[CHANNELS.GREEN] = CHANNELS.MINIMUM;
  this.color.levels[CHANNELS.BLUE] += this.color_increment;
};

Does Blue Wrap Too?

As with red and green, the blue channel can only go up to 255 so once we increase blue to 256:

  • wrap all three channels back to 0

These are our expected values before and after the call to increase.

Channel Before Increase After Increase
Red 255 0
Green 255 0
Blue 255 0
Alpha 255 255
it("And it should wrap-around all colors when blue exceeds 255",
   function(done) {
     CHANNELS.forEach(
       channel => color_increaser.color.levels[channel] = RGB_MAX);

     color_increaser.increase();

     let expected = [RGB_MIN, RGB_MIN, RGB_MIN,
                     RGB_MAX];

      CHANNELS.forEach((channel, index) => expect(
        color_increaser.color.levels[channel]).to.equal(
          expected[index]));

    done();
   });

The Wrap-Blue Conditional

I originally just used a modulus to keep blue within range, but since we're allowing the user to change the increment this might not always go back to zero so here's the conditional that resets the blue channel if it exceeds the limit.

if (this.color.levels[CHANNELS.BLUE] > CHANNELS.MAXIMUM) {
  this.color.levels[CHANNELS.BLUE] = CHANNELS.MINIMUM;
};

And there we have our exhaustive channel incrementer.

The Next Method

I'm going to implement a next method to simplify things a little. It'll call increase and the return the color object. Just because.

describe("And when the next() method is called", function() {

Does the next method increase the color?

To check that next calls the increase method I'll monkey-patch it with a sinon spy and check that when we call next the increase spy gets called.

it("Then it should increase the color",
  function(done) {
    let spy = sinon.spy(color_increaser, "increase");
    color_increaser.next();
    expect(spy.calledOnce).to.be.true;
    spy.restore();
    done();
  });

The Next Method

Now I'll implement the next method and have it call the increase method.

next() {
  this.increase();

Does next return the color?

Instead of requiring the user to make two calls I'll have the next method return the color object directly.

it ("And return the color",
    function(done) {
      let actual = color_increaser.next();
      expect(color_increaser.color).to.be.eql(actual);
      done();
    });

Return the color

Now in our ColorIncreaser.next method we return the color.

return this.color;

Export the Color Increaser

The implementation so far is good enough to get the code working within the p5 sketch, which would normally be the ultimate goal. But in order for the test code to be able to import the ColorIncreaser (using the require function) we need to add a line in the file with the ColorIncreaser definition to export it.

The code given in the tutorial just has the export line, but this will raise an error outside of node.js - so it works for testing but causes a ReferenceError in the browser (when using a python-based server anyway) so to prevent that from happening I added a check that will do the export only if the module is defined, which is an indication that this is being used in node (or I messed up and defined it somewhere else).

if (typeof module != "undefined") {
  module.exports = ColorIncreaser;
};

Running The tests

Now, let's see what it looks like when we run the tests.

mocha ../tests/test*


Given the ColorIncreaser class definition
  When the ColorIncreaser is constructed
    ✔ Then it should be an object
    ✔ And it should set the color_increment
    ✔ And set the color attribute
  And when the increase() method is called
    ✔ Then it should increment red up until 255
    ✔ But red should wrap-around to 0 when it hits 256 and increment green
    ✔ And it should wrap-around green and increase blue if green exceeds 255
    ✔ And it should wrap-around all colors when blue exceeds 255
  And when the next() method is called
    ✔ Then it should increase the color
    ✔ And return the color


9 passing (11ms)

The output in the terminal has some color added to the text so it looks prettier, but otherwise that's the output of running our tests.

The Sketch

Now that we have the ColorIncreaser we can add it to a sketch to change the colors of the square that we're drawing.

The Sketch Function

As I noted before, I'm using the instance-mode syntax for the sketch so this is the function that holds the setup and draw functions.

function flashing_square(p5js) {
  const SIZE = 500;

  let color_increaser;

The setup Function

The setup creates the canvas and color increaser instance.

p5js.setup = function() {
  p5js.createCanvas(SIZE, SIZE);
  color_increaser = new ColorIncreaser(
    1,
    p5js.color(
      CHANNELS.MINIMUM,
      CHANNELS.MINIMUM,
      CHANNELS.MINIMUM,
      CHANNELS.MAXIMUM));
  p5js.background(color_increaser.color);
};

The draw Function

The draw sets the background color and increases its value once per frame.

p5js.draw = function() {
  p5js.background(color_increaser.next());
};

The End

So, there you go. The sketch wasn't so exciting, but the main value in going through the exercise, I think, was being able to get the javascript testing infrastructure working and getting back into using chai and sinon and the crazy world of module imports in javascript.

Sources

The Nature of Code

Table of Contents

The Book

The product page for the book points to the older version of the book.

The version I'm looking at is the second edition which uses p5.js.

Generative Art

The Book

  • Pearson M. Generative art: a practical guide using processing. Shelter Island, NY : London: Manning ; Pearson Education [distributor]; 2011. 197 pages

The Author's Site(s)

Zen Bullets (probably)

The Zen Bullets site doesn't have the author's name listed on it (that I could see) but there's references to this being his pen-name (e.g. on leanpub) and the works look about right.

The Zen Bullets site uses a very small font and you can't scroll the menu on the left if you increase the font size and it pushes the text off the pgae so you it's pretty hard to read the navigational text beyond the top items in the menu, but all the links appear to be to interesting stuff so it's worth it to just click on the links even if you can't read them.

Abandoned Art (Possibly Truly Abandoned)

Warning: uBlock Origin blocks this site because the web-host it uses is listed as untrustworthy, so I haven't actually seen the page, but it's listed in the book and the book's product page so I'm including it mostly to remind myself not to go there, even though they tell you to (the errata page does have a a note saying the site's license is expired, but they didn't fix the main page).

Other Artist's Mentioned In the Book

These are ones that I could find dedicated sites for. The earliest pioneers (other than Manfred Mohr and Paul Brown) don't seem to have websites with their work.

  • Reza Ali
  • Paul Brown: The site looks like it was built in the 1990's so I found it too painful to look through, but there's a lot there.
  • Tom Beddard: His site, Sub.Blue (http only).
  • Robert Hodgin
  • Aaron Koblin: The link is to his web-site (wikipedia page).
  • Manfred Mohr: His site has works going back to the 1960's (switched to computers in 1969). Many have descriptions of what the algorithm does.
  • Casey Reas: One of the creators of Processing.
  • Jerome Saint-Clair: The newest work on the site is from 2012 so he's either inactive or this is an old site.
  • Jared Tarbell: His site "Infinite Center" (latest post January 8, 2020). Is this one of the founders of etsy?. Also complexification.net (2012, no https). The sketchs on the old site are java applets so you have to open the applet (which won't run) then copy the source and run it as java.
  • Jer Thorp: The link is to his github repositories, I couldn't find a web-page for him. There's a reddit page for his blog, but the blog is gone and the reddit threads are old.
  • Marius Waltz : The site only has some work representing what he does, doing an image search with his name and the title of a piece (e.g. Grid Distortion) will pull up more variations.
  • Frederik Vanhoutte: I didn't see his name on the site (winterbloed.be) but Winterbloed appears to be his pen-name. (http only)

Generative Art Circles

A Circle

This is a starting point for looking at cyclic sketches. In this case it's just a circle but it's a basic concept that I'll probably use more of later so I thought I'd make a dedicated post for it. In particular it uses Polar Coordinates which might come in handy.

Closure, Constants, and Variables

We begin in the usual way with a variable to hold the div id that the sketch will go into and declaring the function that will hold our sketch tode.

const CIRCLE_DIV = "5fa2c81b-hard-circle";

function circle_the_hard_way(p5){

Constants

Next I'll declare some constants, both to maybe remind me what the values represent when I use them later and to have a place where I can change the values as I experiment with what looks interesting.

const DEGREES_IN_A_CIRCLE = 360;
const RADIUS = 100;
const SMALL_DIAMETER = 10;
const STEP = 5;
const TO_RADIANS = (2 * Math.PI)/ DEGREES_IN_A_CIRCLE;
const WIDTH = 3 * RADIUS;
const HEIGHT = WIDTH;
  • The RADIUS holds the radius of the circle we're going to draw
  • SMALL_DIAMETER holds the diameter of the circles I'm going to use to draw the main circle.
  • STEP holds the number of degrees I'm going to rotate the starting point of the circle every time it's re-drawn
  • WITDH and HEIGHT are the dimensions of the canvas

To make it less confusing I'll refer to the small circles that make up the big cicrle as "points" most of the time.

Variables

The variables are:

  • center_x, center_y: the center coordinates for the circle. These could be constants but I usually set them in the setup.
  • slider: to hold a slider that will set how many degrees we'll rotate between drawing points on the circle
  • start: the angle at which we'll start drawing the circle.
let center_x;
let center_y;
let slider;
let start = 0;

Set Up

Our setup function creates the canvas, sets the colors and creates the slider to let the user change how big a jump we take between drawing points on the circle

  p5.setup = function() {
    p5.createCanvas(WIDTH, HEIGHT);
    p5.background("white");
    p5.stroke("black");
    p5.fill("black");
    center_x = p5.width/2;
    center_y = p5.height/2;
    slider = p5.createSlider(
      1,
      360,
      2,
      1);
slider.style("width", "500px");
  } // end setup

Draw

The draw function draws a circle using circles and a line showing the raduis.

p5.draw = function() {

Looping Around the Circle

We're going to rotate around the circle once using the start value as the angle to start at and the value the slider's set at for the number of degrees we move between drawing the points on the circle. To make it easier to think about I'm using degrees in the for-loop but the sin and cos functions expect radians so we need to convert the degrees. Since the circumference of a circle is both \(360^\circ\) and \(2\pi\) we can use a straight ratio to convert them.

\[ \textit{radians} = \textit{degrees} \times \frac{2 \pi}{360} \]

This is usually written using a half-circle \(\left(\frac{\pi}{180}\right)\) but I find it easier to remember the whole circle for some reason.

for (let angle=start; angle <= DEGREES_IN_A_CIRCLE + start;
     angle += slider.value()) {
  radians = angle * TO_RADIANS;

The Coordinates of the Circle's Points

The coordinates for our point are calculated using the trigonometric definitions for sin and cos.

\begin{align} \cos \theta &= \frac{adjacent}{hypotenuse} \\ \textit{adjacent} &= \textit{hypotenuse} \times \cos \theta \end{align} \begin{align} \sin \theta &= \frac{opposite}{hypotenuse}\\ \textit{opposite} &= \textit{hypoteuse} \times \sin \theta \end{align}

Using the radius we want as the hypotenuse and the adjacent and opposite values as the x and y coordinates we can re-write the equations as:

\begin{align} x &= r \cos \theta \\ y &= r \sin \theta \end{align}

But since our coordinate system starts in the top left corner we have to add an offset to move the center of the circle to the center of the canvas.

\begin{align} x &= \textit{center}_x + r \cos \theta \\ y &= \textit{center}_y + r \sin \theta \end{align}
x = center_x + RADIUS * Math.cos(radians);
y = center_y + RADIUS * Math.sin(radians);

Now We Draw

Now that we have our x and y coordinates for the next point on the circle we can draw it.

p5.line(center_x, center_y, x, y);
p5.circle(x, y, SMALL_DIAMETER);

And the Rest

If we just draw the points and line we'll end up with a black dot, which still shows that it's working, but kind of negates the point of using something animated, so I'll draw a white background that's mostly transparent so we can see things move.

p5.background(255, 10);

And now I'll increment the start angle so the next time we draw a circle it will be rotated a little bit from where it started this time through the loop.

start = (start + STEP) % 360 ;

Closing Up

And there we have the circle. I had two main reasons for doing this exercise - one was to have a starting point for making noisier shapes and the other was to remind myself of how to make cyclical values so that I can use it as input for functions that I want to have repeat themselves.