Human Face Detection
Table of Contents
Introduction
In this post, I'll use two libraries to detect human faces in images - OpenCV and a python interface to dlib called face_recognition.
Set Up
Imports
Python
from functools import partial
import os
PyPi
from dotenv import load_dotenv
from PIL import Image
import cv2
import face_recognition
import matplotlib
import matplotlib.image as matplotlib_image
import matplotlib.patches as patches
import matplotlib.pyplot as pyplot
import numpy
import seaborn
This Project
from neurotic.tangles.data_paths import DataPathTwo
from neurotic.tangles.f1_scorer import F1Scorer
from neurotic.tangles.timer import Timer
Set Up the Plotting
get_ipython().run_line_magic('matplotlib', 'inline')
get_ipython().run_line_magic('config', "InlineBackend.figure_format = 'retina'")
seaborn.set(style="whitegrid",
            rc={"axes.grid": False,
                "font.family": ["sans-serif"],
                "font.sans-serif": ["Open Sans", "Latin Modern Sans", "Lato"],
                "figure.figsize": (8, 6)},
            font_scale=1)
Build the Timer
timer = Timer()
Helpers
def first_prediction(source: list, start:int=0) -> int:
    """Gets the index of the first True prediction

    Args:
     source: list of True/False predictions
     start: index to start the search from

    Returns:
     index of first True prediction found
    """
    for index, prediction in enumerate(source[start:]):
        if prediction:
            print("{}: {}".format(start + index, prediction))
            break
    return start + index
Set the Random Seed
numpy.random.seed(2019)
The Data
Download the human dataset (this is a download link), unzip the folder, and place it in a folder named /lfw.
The human dataset is the Labeled Faces in the Wild data set which was built to study the problem of facial recognition. It's made up of real photos of people taken from the web. Each photo sits in a sub-folder that was given the name of the person (e.g. Michelle_Yeoh). The folder hasn't been split inte train-test-validiation folders the way the dog dataset was.
The dog dataset (this is also a download link) is in a zip-file hosted on Amazon Web Services. The folder should contain three folders (test, train, and valid) and each of these folders should have 133 folders, one for each dog-breed. It looks like the Stanford Dogs Dataset, but the Stanford data set has 120 breeds, so I don't know the actual source.
You might be thinking Why are we loading dog images if this is about detecting human faces? but our goal is to discern human images from dog images so the dog images will act as our negative data set (the one we don't want to detect faces in).
The Paths to the Data
load_dotenv()
dog_path = DataPathTwo(folder_key="DOG_PATH")
print(dog_path.folder)
assert dog_path.folder.is_dir()
for folder in dog_path.folder.iterdir():
    print("Dog: {}".format(folder))
human_path = DataPathTwo(folder_key="HUMAN_PATH")
print(human_path.folder)
assert human_path.folder.is_dir()

for name in human_path.folder.glob("Gina*"):
    print(name)
/home/hades/datasets/dog-breed-classification/dogImages
Dog: /home/hades/datasets/dog-breed-classification/dogImages/valid
Dog: /home/hades/datasets/dog-breed-classification/dogImages/train
Dog: /home/hades/datasets/dog-breed-classification/dogImages/test
/home/hades/datasets/dog-breed-classification/lfw
/home/hades/datasets/dog-breed-classification/lfw/Gina_Torres
/home/hades/datasets/dog-breed-classification/lfw/Gina_Centrello
/home/hades/datasets/dog-breed-classification/lfw/Gina_Gershon
/home/hades/datasets/dog-breed-classification/lfw/Gina_Lollobrigida
timer.start()
people = len(set(human_path.folder.iterdir()))
images = len(set(human_path.folder.glob("*/*")))
print("People Count: {:,}".format(people))
print("Image Count: {:,}".format(images))
print("Images Per Person: {:.2f}".format(images/people))
timer.end()
People Count: 5,749
Image Count: 13,233
Images Per Person: 2.30
Ended: 2019-01-02 19:28:11.529962
Elapsed: 0:00:00.550351
Load All the Files
timer.start()
human_files = numpy.array(list(human_path.folder.glob("*/*")))
dog_files = numpy.array(list(dog_path.folder.glob("*/*/*")))
print('There are {:,} total human images.'.format(len(human_files)))
print('There are {:,} total dog images.'.format(len(dog_files)))
timer.end()
There are 13,233 total human images.
There are 8,351 total dog images.
Ended: 2019-01-02 19:28:20.426379
Elapsed: 0:00:00.816752
The human_files and dog_files are numpy arrays of python Path objects pointing to image files. Note that at this point we've thrown away all the dog-breed information as well as the names of the people in the images. We're only going for a binary split - human or not human.
Test Sets
The models we're going to use are pre-trained so we're just going to choose 100 images from each set to see how well they do.
human_files_short = numpy.random.choice(human_files, 100)
dog_files_short = numpy.random.choice(dog_files, 100)
The Scorer
The human_scorer will score how well the detectors did on our data sets. The only thing that needs to be passed into it is the detector/predictor that decides if an image has a human in it. Calling it will produce an org-table with some metrics about how well it did.
human_scorer = partial(F1Scorer,
                       true_images=human_files_short,
                       false_images=dog_files_short)
OpenCV
We're going to use OpenCV's implementation of Haar feature-based cascade classifiers to detect human faces in images.
OpenCV provides pre-trained face detectors stored as XML files on github. The detector I'm going to use is stored in a directory named haarcascades. Here's a demonstration of how to use this face detector to find a human face in an image.
Extract the Pre-Trained Face Detector
haar_path = DataPathTwo("haarcascade_frontalface_alt.xml", folder_key="HAAR_CASCADES")
assert haar_path.from_folder.is_file()
Ended: 2019-01-02 19:28:33.152747
Elapsed: 0:00:00.000933
As you can see from the file-name this detector is tuned for faces looking at the camera (as opposed to, say, a face in profile). Now we need to build the classifier using the XML file.
class OpenCVFaceDetector:
    """OpenCV Face Detector

    Args:
     path: path to the model's XML file
    """
    def __init__(self, path: str) -> None:
        self.path = path
        self._classifier = None
        return

    @property
    def classifier(self) -> cv2.CascadeClassifier:
        """Face Classifier"""
        if self._classifier is None:
            self._classifier = cv2.CascadeClassifier(self.path)
        return self._classifier

    def detect_faces(self, image_path: str) -> numpy.ndarray:
        """Find faces in an image

        Args:
         image_path: path to the image

        Returns:
         array of bounding boxes
        """
        # this creates a Matplotlib Image
        image = cv2.imread(str(image_path))
        # the classifier needs a grayscale image
        grayscale = cv2.cvtColor(image, cv2.COLOR_BGR2GRAY)
        return self.classifier.detectMultiScale(grayscale)

    def add_bounding_boxes(self, image_path: str) -> numpy.ndarray:
        """Adds bounding boxes to the image

        Args:
         image: path to the image

        Returns:
         RGB image with faces boxed in
        """
        faces = self.detect_faces(image_path)
        # this is redundant, but it's only for troubleshooting
        image = cv2.imread(str(image_path))

        # The arguments to the ``cv2.rectangle`` call are
        #  - image
        #  - the top-left coordinates of the rectangle
        #  - the bottom-right coordinates of the rectangle
        #  - the color
        #  - the thickness of the line.
        for top_left_x, top_left_y ,width, height in faces:
            cv2.rectangle(image,
                  (top_left_x, top_left_y),
                  (top_left_x + width, top_left_y + height),
                  (255,0,0), 2)
        # the image is BGR, so the triplet setting the color =(200, 0, 0)=
        # is setting the rectangle to blue.
        # before we convert it to RGB
        return cv2.cvtColor(image, cv2.COLOR_BGR2RGB)

    def has_face(self, image_path: str) -> bool:
        """Checks if the image contains faces

        Args:
         image_path: path to the image file

        Returns:
         True if there is at least one face in the image
        """
        return len(self.detect_faces(image_path)) > 0
open_cv_detector = OpenCVFaceDetector(str(haar_path.from_folder))
Check Out How It Works On An Image
Before trying to use it, let's see how it does on one of our faces.
figure, axe = pyplot.subplots()
figure.suptitle("OpenCV Face-Detection Bounding Box", weight="bold")
image = axe.imshow(open_cv_detector.add_bounding_boxes(human))
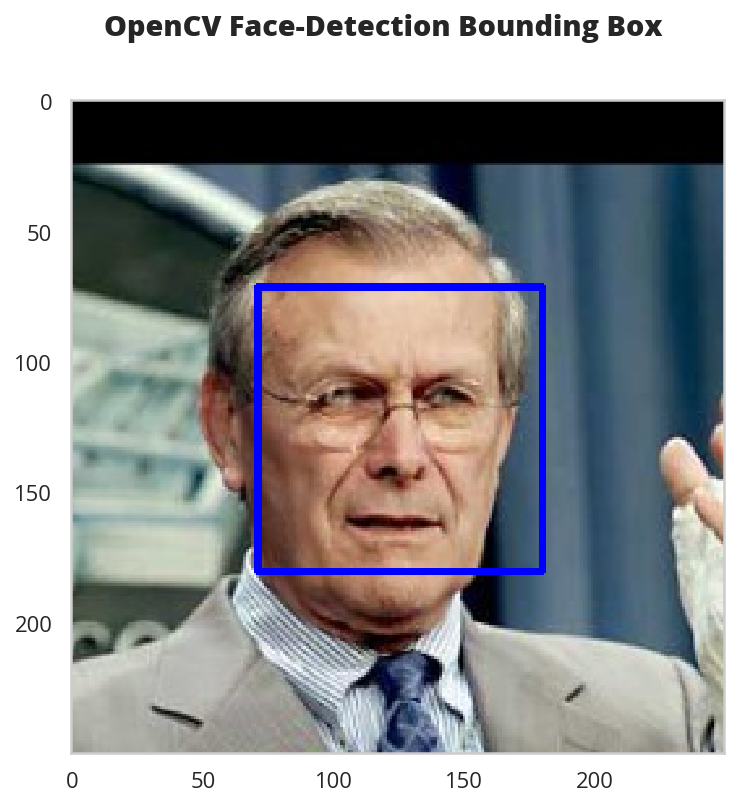
Seems like it did a reasonable job. If you run this enough times you'll note that it draws the tightest box when the person is facing the camera directly and grabs more negative space when the person angles their head away from the camera.
Face Detector
Now that we have something that will draw bounding boxes for any faces it finds in photographs we can create a face-detector that just returns True if there is a face or False if there isn't one.
Testing the Face Detector
Here we're going to see how well the face detector does at detecting human faces and not mistaking dogs for humans.
open_cv_scorer = human_scorer(open_cv_detector.has_face)
open_cv_scorer()
| Metric | Value |
|---|---|
| Accuracy | 0.92 |
| Precision | 0.85 |
| Recall | 1.00 |
| Specificity | 0.83 |
| F1 | 0.92 |
| Ended | 2019-01-03 14:01:49.321416 |
| Elapsed | 0:00:17.670546 |
It did pretty well, but was penalized for some false-positives. What did a false positive look like?
Looking at the False Positives
dogman_index = first_prediction(open_cv_scorer.false_image_predictions)
1: True
So the image at index 1 was a dog that the OpenCV detector thought was a human.
figure, axe = pyplot.subplots()
source = dog_files_short[dogman_index]
name = " ".join(
    os.path.splitext(
        os.path.basename(source))[0].split("_")[:-1]).title()
figure.suptitle("Dog-Human OpenCV Prediction ({})".format(
    name), weight="bold")
image = Image.open(source)
image = axe.imshow(image)

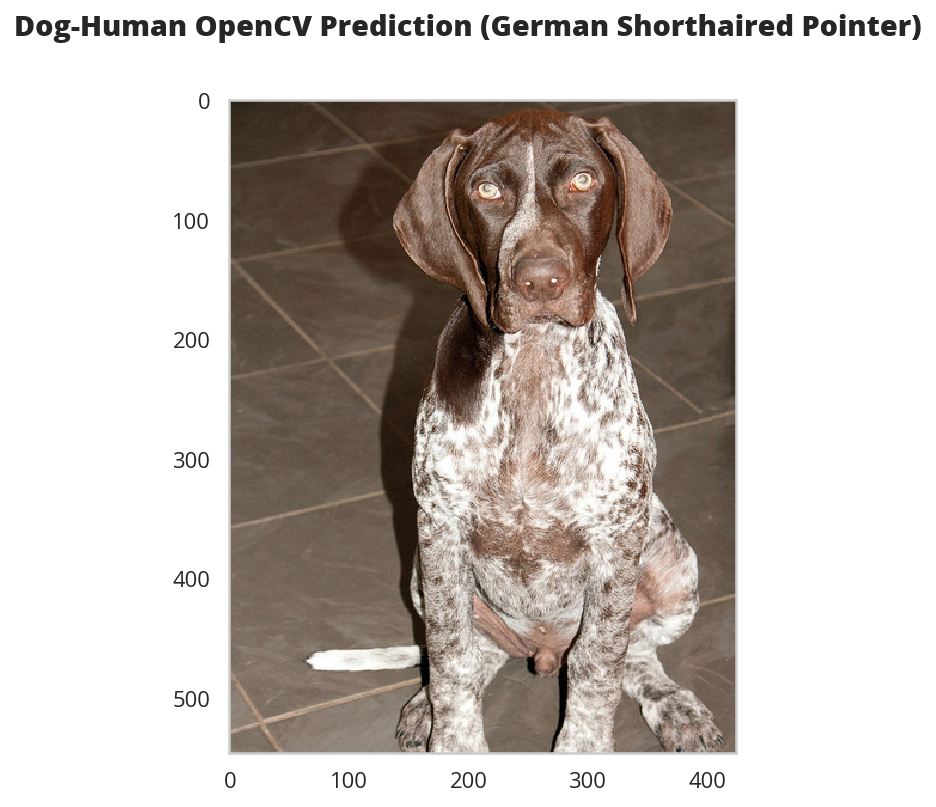
This doesn't really look like a human, but I don't think the detector is specifically trained for humans so much as features that human have when looking straight at the camera, so I'm guessing straight-on views will create false positives. Although the mouth seems to be kind of inhuman.
DLIB
Now for another face-detector, this time using face_recognition, a python interface to dlib's facial recognition code.
Testing It With an Image
Let's see how the bounding box it produces looks given the same image that the OpenCV detector was given.
The face-recognition code is much simpler, but to make it consistent I'll add a class that matches the OpenCVFaceDetector.
class DlibFaceDetector:
    """DLIB (via face_detector) face detector"""
    def detect_faces(self, image_path: str) -> numpy.ndarray:
        """Finds the locations of faces

        Args:
         image_path: path to the image

        Returns:
         array of bounding box coordinates for the face(s)
        """
        image = face_recognition.load_image_file(str(image_path))
        return face_recognition.face_locations(image)

    def add_bounding_boxes(self, image_path: str,
                           axe: matplotlib.axes.Axes) -> None:
        """Adds patches to the current matplotlib figure

        Args:
         image_path: path to the image file
         axe: axes to add the rectangle to
        """
        for (top, right, bottom, left) in self.detect_faces(image_path):
            width = right - left
            height = top - bottom
            rectangle = patches.Rectangle((top, right), width, height,
                                          fill=False)
            axe.add_patch(rectangle)
        return

    def has_face(self, image_path: str) -> bool:
        """Checks if there is at least one face in the image

        Args:
         image_path: path to the image file

        Returns:
         True if there's at least one face in the image
        """
        return len(self.detect_faces(image_path)) > 0
dlib_detector = DlibFaceDetector()
figure, axe = pyplot.subplots()
image = matplotlib_image.imread(str(human))
figure.suptitle("dlib Face Recognition Bounding-Box", weight='bold')
dlib_detector.add_bounding_boxes(str(human), axe)
plot = axe.imshow(image)

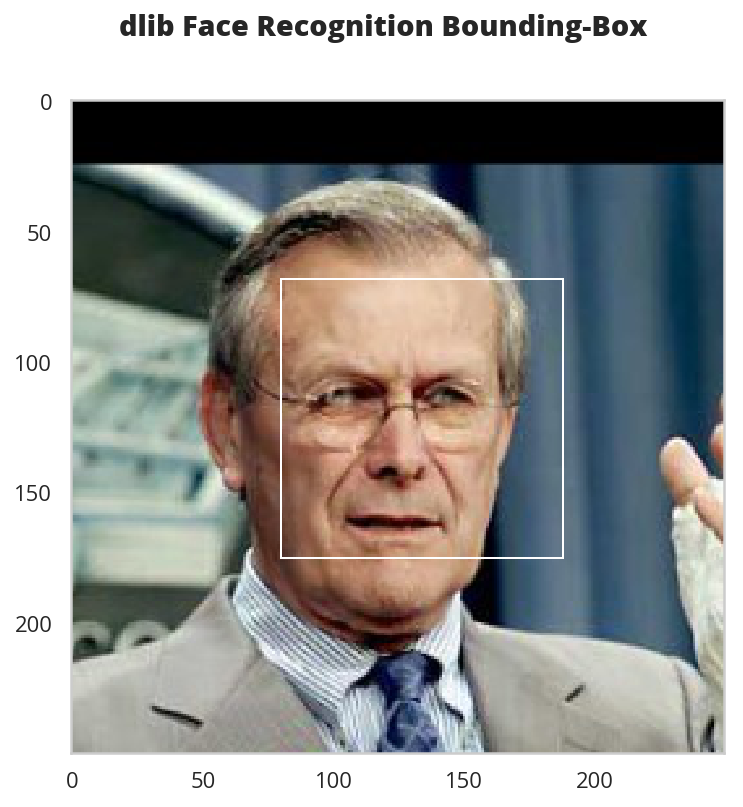
It seems pretty comparable to what the OpenCV detector came up with.
Measuring Performance
Once again I'll run it through the FI scorer to see what's what.
dlib_scorer = human_scorer(dlib_detector.has_face)
dlib_scorer()
| Metric | Value |
|---|---|
| Accuracy | 0.92 |
| Precision | 0.86 |
| Recall | 1.00 |
| Specificity | 0.84 |
| F1 | 0.93 |
| Ended | 2019-01-03 14:31:36.848015 |
| Elapsed | 0:00:47.395556 |
The dlib model did slightly better with its avoidance of false positives, but it might not be enough to justify the extra time.
False Humans
What kind of image did the DLib Classifier classify as human when it came from the dog images?
dlib_dog_human_index = first_prediction(dlib_scorer.false_image_predictions)
11: True
figure, axe = pyplot.subplots()
source = dog_files_short[dlib_dog_human_index]
name = " ".join(
    os.path.splitext(
        os.path.basename(source))[0].split("_")[:-1]).title()
figure.suptitle("Dog-Human DLib Prediction ({})".format(
    name), weight="bold")
image = Image.open(source)
image = axe.imshow(image)

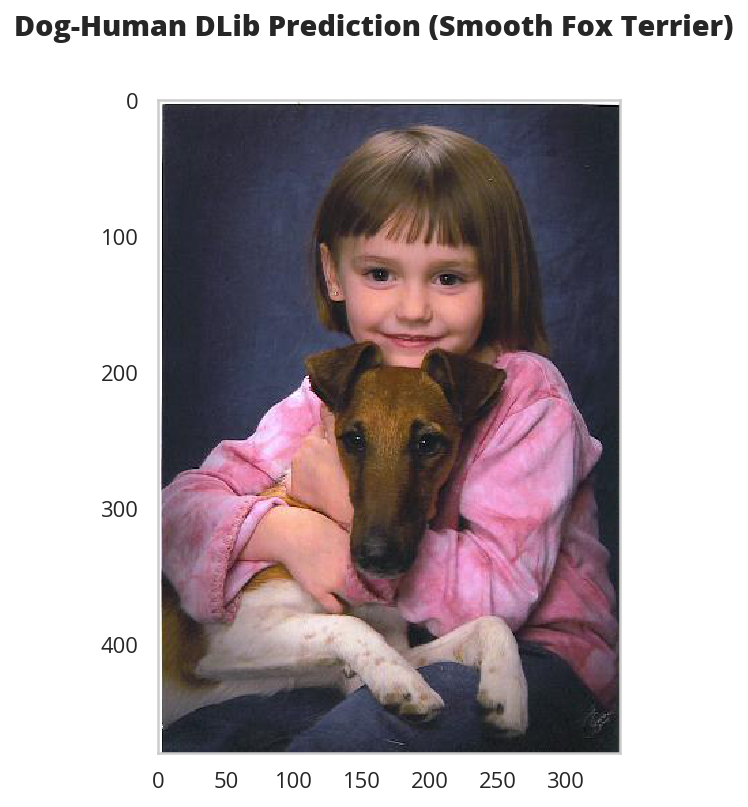
Well, this was a bit of a surprise. I don't know that it's really fair to be using this type of image, but what can you do?