Org-Babel Cheat Sheet

Keyboard Shortcuts

Code Block Shortcuts

Keys Command Effect
C-c C-c org-babel-execute-src-block Execute the code in the current block.
C-c '   Open/close edit-buffer with mode set to match the code-block language.
C-c C-v C-z org-babel-switch-to-session Open a python/ipython console (only works with :session)

Buffer-wide Shortcuts

Keys Command Effect
<s Tab   Create a code block.
C-c C-v C-b org-babel-execute-buffer Execute all code blocks in buffer.
C-c C-v C-f org-babel-tangle-file Tangle all blocks marked to :tangle
C-c C-v C-t org-babel-tangle Seems like an alias for tangle file…

Code Block Headers

This is the subset of headers/header values that I'm interested in right now.

Code to tangle

The pattern I use to tangle (create an external code file) is:

  • python as the language (since I'm not using it with an interactive session, no need for ipython)
  • :noweb tangle is turned on from init.el so that I can substitute code defined elsewhere into the block
  • :tangle <path to file>
  #+begin_src python :tangle literate_python/literate.py
    """A docstring for the literate.py module"""

    # imports
    import sys
    <<literate-main-imports>>

    # constants

    # exception classes

    # interface functions

    # classes


    <<LiterateClass-definition>>

    # internal functions & classes

    <<literate-main>>


    if __name__ == "__main__":
        status = main()
        sys.exit(status)
  #+end_src

Since I have :noweb tangle set, the substitions (e.g. <<literate-main-imports>>) don't get expanded in HTML/Latex output (although they do when you create the python file).

  """A docstring for the literate.py module"""

  # imports
  import sys
  <<literate-main-imports>>

If you want to show the substitutions when exporting use :noweb yes in the header.

  """A docstring for the literate.py module"""

  # imports
  import sys

A named section

The noweb substitution above (<<literate-main-imports>>) worked because there was a named-section (defined here) that it could use:

  #+name: literate-main-imports
  #+begin_src python
    from argparse import ArgumentParser
  #+end_src

Update

I now prefer to use :noweb-ref in the header instead of the separate #+name: block.

  #+begin_src python :noweb-ref literate-main-imports
    from argparse import ArgumentParser
  #+end_src

Results

The :results header argument declares how to handle what's returned from executing a code block. There are three classes of arguments and you can use up to one of each in the header.

Result Classes

Class Meaning
collection How the results should be collected if there's multiple outputs.
type Declare what type of result the code block will return.
handling How should results be handled.

Collection Class

Option Meaning
value (Default) Uses the value of the last statement in the block (python requires a return statement)
output (:results output) Collects everything sent to stdout in the block.

Type Class

Option Example Meaning
table :results value table Return an org-mode table (vector)
scalar :results value scalar Return exactly the value returned (string)
file :results value file Return an org-mode link to a file
raw :results value raw Return as org-mode command
html :results value html Expect contents for #+begin_html
latex :results value latex Expect contents for #+begin_latex
code :results value code Expect contents for #+begin_src
pp :results value pp Expect code and pretty-print it

Handling Class

Option Example Meaning
silent :results output silent Don't output in org-mode buffer
replace :results output replace (Default) Overwrite any previous result
append :results output append Append output after any previous output
prepend :results output prepend Put output above any previous output

Exports

This argument tells org-babel what to put in any exported HTML or Latex files.

Option Example Meaning
code :exports code (default) The code in the block will be included in the export.
results :exports results The result of evaluating the code will be included.
both :exports both Include code and results in the file.
none :exports none Don't include anything in the file.

Running Tests

Say there was another section in the document that tangled a test-file (named testliterate.py) to test our main source file. Once both are tangled you can run it in the document using sh as the language. The org-mode documentation shows a more complex version of this which builds a pass-fail table, but that's beyond me right now.

   #+name: shell-run-pytest
   #+begin_src sh :results output :exports both
   py.test -v literate_python/testliterate.py
   #+end_src
============================= test session starts ==============================
platform linux -- Python 3.5.1+, pytest-3.0.5, py-1.4.32, pluggy-0.4.0 -- /home/cronos/.virtualenvs/nikola/bin/python3
cachedir: .cache
rootdir: /home/cronos/projects/nikola/posts, inifile: 
plugins: faker-2.0.0, bdd-2.18.1
collecting ... collected 1 items

literate_python/testliterate.py::test_constructor PASSED

=========================== 1 passed in 0.06 seconds ===========================

Specific Block Cases

Plant UML

Besides setting the language to plantuml you need to specify and output-file path and set :exports results so that the actual plantuml code won't be in the exported document but the diagram will.

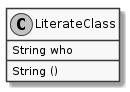
#+begin_src plantuml :file literate_python/literateclass.png :exports results
skinparam monochrome true

LiterateClass : String who
LiterateClass : String ()
#+end_src

ob-ipython

The main thing to remember for ob-ipython is that you need to run it as a :session. I didn't do it for most of the examples, but I've found since I first wrote this that using named sessions makes it a lot easier to work. Otherwise you might have more than one buffer with an org-babel document and they will be sharing the same ipython process, which can cause mysterious errors.

#+begin_src ipython :session session1
  # python standard library
  import os
#+end_src

When using pandas most of the methods produce values, but the info method instead prints to stdout so you have to specify this as the :results or it will popup a separate buffer with the output.

#+begin_src ipython :session session1 :results output
housing.info()
#+end_src

When you create figures, besides making sure that you use the %matplotlib inline magic, you also need to specify a file path where matplotlib can save the image.

#+BEGIN_SRC ipython :session session1 :file "images/ocean_proximity_count.png"
figure = seaborn.countplot(x="ocean_proximity", data=housing)
#+end_src

Set Up

Dependencies

I'm using ob-ipython to use jupyter/ipython with org-babel so you have to install it (I used MELPA). In addition you need to install the python dependencies, the main ones being ipython and jupyter. Additionally, I use elpy (also from MELPA) which has its own dependencies. I think the easiest way to check and see what elpy dependencies you need is to install elpy (there's two components, an emacs one you install from melpa and a python component you install from pip) then run M-x elpy-config to see what's missing.

init.el

Since I mentioned ob-ipython and elpy I'll list what I have in my init.el file for elpy and org-babel.

Elpy

;; elpy
(elpy-enable)
(setq elpy-rpc-backend "jedi")
(eval-after-load "python"
 '(define-key python-mode-map "\C-cx" 'jedi-direx:pop-to-buffer))
(elpy-use-ipython)

org-babel

;; org-babel
;;; syntax-highlighting/editing
(add-to-list 'org-src-lang-modes '("rst" . "rst"))
(add-to-list 'org-src-lang-modes '("feature" . "feature"))

;;; languages to execute/edit
(org-babel-do-load-languages
 'org-babel-load-languages
 '((ipython . t)
   (plantuml . t)
   (shell . t)
   (org . t)
   ;; other languages..
   ))

;;; noweb expansion only when you tangle
(setq org-babel-default-header-args
      (cons '(:noweb . "tangle")
            (assq-delete-all :noweb org-babel-default-header-args))
      )

;;; Plant UML diagrams
(setq org-plantuml-jar-path (expand-file-name "/usr/share/plantuml/plantuml.jar"))

;;; execute block evaluation without confirmation
(setq org-confirm-babel-evaluate nil)   

;;; display/update images in the buffer after evaluation
(add-hook 'org-babel-after-execute-hook 'org-display-inline-images 'append)

Integrating with Nikola/Sphinx

Python with Org-Babel

What is this about?

This is an initial look at how to use org-babel to create a literate-programming document. In the past I have used jupyter notebooks and pweave to do similar things, with each having a separate role - jupyter notebooks are good for interactive exploration but somewhat less amenable to working with sphinx (which I did with pweave). The hope here is that the org-babel system will provide something more amenable to both. Since you still have to convert the org-files to restructured text files (with pandoc or ox-nikola) it's still not everything I wanted, but hopefully this will make things a little easier

Most of this is stolen from this page - I'm fairly new to org-babel in general so I'm just walking in other people's footsteps for now.

Also, the inclusion of the org-babel code turned out to be both tedious and aesthetically unsatisfying so I didn't do it as much as I thought I would. The original org-file is here.

High-Level Module Structure

One nice thing about the org-babel/noweb system is that it has a system that makes it easy to create a template (in this case based on the the module structure from Code Like A Pythonista) with parts that we're updating inserted using the noweb syntax. To actually see this I had to include the python code as an org-mode snippet so the syntax highlighting isn't there.

  #+begin_src python :noweb yes :tangle literate_python/literate.py
    """A docstring for the literate.py module"""

    # imports
    import sys
    <<literate-main-imports>>

    # constants

    # exception classes

    # interface funchtions

    # classes


    <<LiterateClass-definition>>

    # internal functions & classes

    <<literate-main>>


    if __name__ == "__main__":
        status = main()
        sys.exit(status)
  #+end_src

This is what the final file looks like once the no-web substitutions happen.

  """A docstring for the literate.py module"""

  # imports
  import sys
  from argparse import ArgumentParser

  # constants

  # exception classes

  # interface funchtions

  # classes


  class LiterateClass(object):
      """A class to be substituted above

      Parameters
      ----------

      String who: name of user
      """
      def __init__(self, who):
          self.who = who
          return

      def __call__(self):
          print("Who: {0}".format(self.who))

  # internal functions & classes

  def main():
      parser = ArgumentParser(description="literate caller")
      parser.add_argument("-w", "--who", type=str,
                          default="me", help="who are you?")
      args = parser.parse_args()
      who = args.who
      thing = LiterateClass(who)
      thing()
      return 0


  if __name__ == "__main__":
      status = main()
      sys.exit(status)

To create the `literate.py` file (and all the other code-files) you see above execute M-x org-babel-tangle.

LiterateClass

This is the class definition that get substituted above. The code block for the definition is named LiterateClass-definition so the main template will substitute its contents for <<LiterateClass-definition>> when it gets tangled.

nil

class LiterateClass(object):
    """A class to be substituted above

    Parameters
    ----------

    String who: name of user
    """
    def __init__(self, who):
        self.who = who
        return

    def __call__(self):
        print("Who: {0}".format(self.who))

Main functions

The Code Like a Pythonista template expects that you are creating a command-line executable with a main entry-point. This section implements that case as an example.

First the <<literate-main-imports>>.

from argparse import ArgumentParser

Now the <<literate-main>>.

def main():
    parser = ArgumentParser(description="literate caller")
    parser.add_argument("-w", "--who", type=str,
                        default="me", help="who are you?")
    args = parser.parse_args()
    who = args.who
    thing = LiterateClass(who)
    thing()
    return 0

As a quick check we can run the code at the command line to see that it's working (the main block has to be tangled for this to work).

python literate_python/literate.py --who "Not Me"
Who: Not Me

Testing

One nice thing about the org-babel infrastructure is that the tests and source can be put in the same org-file, then exported to separate files to be run.

Doctest

For the stdout output, doctesting can be a convenient way to check that things are behaving as expected while also providing an explicit example of how to run the command-line interface.

Setting up the cases

The output of a successful doctest is nothing, which is good for automated tests but less interesting here so I'll make a doctest that passes and one that should fail.

This next section (named literate-doctest) creates a code snippet that will pass.

example::
  >>> from literate_python.literate import LiterateClass
  >>> thing = LiterateClass("Gorgeous George")
  >>> thing()
  Who: Gorgeous George

And now here's a test (named literate-bad-doctest) that will fail.

bad::
  >>> bad_thing = LiterateClass("Gorilla Glue")
  >>> bad_thing()
  Who: Magilla Gorilla

This next section will include the two doctests and export them to a file so they can be tested. Note that you need an empty line between the tests for both of them to run. Warning - since this file is going to be exported, if you are using nikola or some other system that assumes all files with a certain file-extension are blog-posts you have to use an extension that won't get picked up (in my case both rst and txt were interpreted as blog-posts).

#+begin_src text :noweb yes :tangle literate_python/test_literate_output.doctest :exports none
<<literate-doctest>>

<<literate-bad-doctest>>
#+end_src

Which gets tangled into this. Note that the doctests aren't valid python so you can tangle this but not execute it.

example::
  >>> from literate_python.literate import LiterateClass
  >>> thing = LiterateClass("Gorgeous George")
  >>> thing()
  Who: Gorgeous George

bad::
  >>> bad_thing = LiterateClass("Gorilla Glue")
  >>> bad_thing()
  Who: Magilla Gorilla

Running the doctests

Now we can actually run them with python to see what happens.

python -m doctest literate_python/test_literate_output.doctest
true
**********************************************************************
File "literate_python/test_literate_output.doctest", line 9, in test_literate_output.doctest
Failed example:
    bad_thing()
Expected:
    Who: Magilla Gorilla
Got:
    Who: Gorilla Glue
**********************************************************************
1 items had failures:
   1 of   5 in test_literate_output.doctest
***Test Failed*** 1 failures.

Note that since this returned a non-zero exit code (I think) you need to put true in the code block or there would be no output.

PyTest BDD

While doctests are neat I prefer unit-testing, in particular using Behavior Driven Development (BDD) facilitated in this case by py.test and pytest_bdd.

The feature file

Identifying the code-block with #+begin_src feature adds some syntax highlighting (if you have feature-mode installed and set-up). This works both when you are in the external editor and in the main org-babel document as well.

To make sure that org-babel recognizes feature mode add this to the init.el file.

(add-to-list 'org-src-lang-modes '("feature" . "feature"))

This is what is going in the feature file.

Feature: Literate Class
Scenario: Creating a literate object
  Given a name
  When a Literate object is created with the name
  Then the literate object has the name

The test file

This is another file that gets tangled out. In this case it is so that we can run py.test on it.

from expects import expect
from expects import equal
from pytest import fixture
from pytest_bdd import given
from pytest_bdd import scenario
from pytest_bdd import then
from pytest_bdd import when

# this code
from literate import LiterateClass

FEATURE_FILE = "literate.feature"


class Context(object):
    """context object"""


@fixture
def context():
    return Context()


@scenario(FEATURE_FILE, "Creating a literate object")
def test_constructor():
    return


@given("a name")
def add_name(context, faker):
    context.name = faker.name()


@when('a Literate object is created with the name')
def create_object(context):
    context.object = LiterateClass(context.name)


@then("the literate object has the name")
def check_object_name(context):
    expect(context.name).to(equal(context.object.who))
    return

Running the test

One important thing to note is that this will put an error message in a separate buffer if something goes wrong (like you don't have py.test installed), which in at least some cases makes it look like it failed silently. Unlike with the doctests, no output means something in the setup needs to be fixed, so you should tangle the file and then run it at the command-line to debug what happened.

py.test -v literate_python/testliterate.py
============================= test session starts ==============================
platform linux -- Python 3.5.1+, pytest-3.0.5, py-1.4.32, pluggy-0.4.0 -- /home/cronos/.virtualenvs/nikola/bin/python3
cachedir: .cache
rootdir: /home/cronos/projects/nikola/posts, iniimg-url: 
plugins: faker-2.0.0, bdd-2.18.1
collecting ... collected 1 items

literate_python/testliterate.py::test_constructor PASSED

=========================== 1 passed in 0.04 seconds ===========================

Getting This Into Nikola

I tried three ways to get this document into nikola:

  • converting to rst with pandoc
  • exporting it with ox-nikola
  • using the orgmode plugin for nikola

ox-nikola worked (as did pandoc), but at the moment I'm trying to use the orgmode plugin so that I can keep editing this document without having to convert back and forth. This is turning out to be about the same amount of work as using jupyter (and with a steeper learning curve). But I like the folding and navigation that org-mode offers, so I'll stick with it for a bit. I'm just using the default set-up right now. It seems to work.

The main problem I had initially was the same one I had with jupyter - I'm starting with a file that wasn't generated by the nikola new_post sub-command so it didn't have the header that nikola expected but the only error nikola build reported was an invalid date format.

This is what needs to be at the top of the org-file for nikola to work with it (or something like it).

 #+BEGIN_COMMENT
.. title: Python with Org-Babel
.. slug: python-with-org-babel
.. date: 2016-12-28 14:12:41 UTC-08:00
.. tags: howto python babel literateprogramming
.. category: how_to
.. link: 
.. description: 
.. type: text
#+END_COMMENT

The other thing is that the org-mode plugin doesn't seem to copy over the png-files correctly (or at all) so I had to create a files/posts/python-with-org-babel/literate_python folder and move the UML diagram over there by hand. Lastly, it didn't color the feature file and since there's no intermediate rst-file I don't really know how to fix this. Either I'm going to have to learn a lot more about org-mode than I might want to, or for cases where I want more control over things I'll use ox-nikola to convert it to rst first and edit it. That kind of wrecks the one-document idea, but I guess it would also give me a reason to re-work and polish things instead of improvising everything.

SVC C-value and Accuracy

SVC Cross Validtion Scores vs C-value

The goal here is to visualize the effect of the C parameter (the amount of regularization penalty to use) on a Support Vector Classifier when classifying samples from the digits dataset. I'm going to use 10-fold cross validation and the cross_val_score function to get the scores then plot them with matplotlib.

In [245]:
import matplotlib.pyplot as plot
import seaborn
from sklearn import datasets
from sklearn import svm
from sklearn.model_selection import cross_val_score
from sklearn.model_selection import KFold
In [246]:
%matplotlib inline

The data

In [247]:
digits = datasets.load_digits()
In [248]:
print(digits.DESCR)
Optical Recognition of Handwritten Digits Data Set
===================================================

Notes
-----
Data Set Characteristics:
    :Number of Instances: 5620
    :Number of Attributes: 64
    :Attribute Information: 8x8 image of integer pixels in the range 0..16.
    :Missing Attribute Values: None
    :Creator: E. Alpaydin (alpaydin '@' boun.edu.tr)
    :Date: July; 1998

This is a copy of the test set of the UCI ML hand-written digits datasets
http://archive.ics.uci.edu/ml/datasets/Optical+Recognition+of+Handwritten+Digits

The data set contains images of hand-written digits: 10 classes where
each class refers to a digit.

Preprocessing programs made available by NIST were used to extract
normalized bitmaps of handwritten digits from a preprinted form. From a
total of 43 people, 30 contributed to the training set and different 13
to the test set. 32x32 bitmaps are divided into nonoverlapping blocks of
4x4 and the number of on pixels are counted in each block. This generates
an input matrix of 8x8 where each element is an integer in the range
0..16. This reduces dimensionality and gives invariance to small
distortions.

For info on NIST preprocessing routines, see M. D. Garris, J. L. Blue, G.
T. Candela, D. L. Dimmick, J. Geist, P. J. Grother, S. A. Janet, and C.
L. Wilson, NIST Form-Based Handprint Recognition System, NISTIR 5469,
1994.

References
----------
  - C. Kaynak (1995) Methods of Combining Multiple Classifiers and Their
    Applications to Handwritten Digit Recognition, MSc Thesis, Institute of
    Graduate Studies in Science and Engineering, Bogazici University.
  - E. Alpaydin, C. Kaynak (1998) Cascading Classifiers, Kybernetika.
  - Ken Tang and Ponnuthurai N. Suganthan and Xi Yao and A. Kai Qin.
    Linear dimensionalityreduction using relevance weighted LDA. School of
    Electrical and Electronic Engineering Nanyang Technological University.
    2005.
  - Claudio Gentile. A New Approximate Maximal Margin Classification
    Algorithm. NIPS. 2000.

Set up 10 Folds Cross Validation

In [249]:
k_folds = KFold(n_splits=10)

Set up the logarithmic C-values

In [250]:
c_values = numpy.logspace(-10, 0, 10)

Set up the linear Support Vector Classifier

In [251]:
model = svm.SVC(kernel='linear')

Get cross-validation scroes for each C-value

In [252]:
scores = [cross_val_score(model.set_params(C=c_value),
                          digits.data,
                          digits.target,
                          cv=k_folds,
                          n_jobs=-1) for c_value in c_values]

Plot the mean-scores and standard deviations.

In [253]:
means = numpy.array([numpy.mean(score) for score in scores])
deviations = numpy.array([numpy.std(score) for score in scores])
In [254]:
seaborn.set_style("whitegrid")
figure = plot.figure()
axe = figure.gca()
line = plot.plot(c_values, means, axes=axe)
line = plot.plot(c_values, means + deviations, '--')
line = plot.plot(c_values, means - deviations, '--')
title = axe.set_title("Accuracy vs C")
label = axe.set_ylabel("Accuracy")
labels = axe.set_ylabel("C Value")
axe.set_xscale('log')
In [255]:
best_index = means.argmax()
best_c = c_values[means.argmax()]
best_mean = means[best_index]
best_std = deviations[best_index]
print("Best C-value: {0:.5f}".format(best_c))
Best C-value: 0.07743
In [256]:
print("95% Confidence Interval for Accuracy: ({0:.2f} +/- {1:.2f})".format(best_mean,
                                                                           best_std))
95% Confidence Interval for Accuracy: (0.96 +/- 0.02)
In [257]:
model = svm.SVC(kernel="linear")
scores = cross_val_score(model, digits.data, digits.target, cv=k_folds, n_jobs=-1)
mean = numpy.mean(scores)
std = numpy.std(scores)
print("95% Confidence Interval for accuracy of default C-value: ({0:.2f} +/- {1:.2f})".format(mean, std))
95% Confidence Interval for accuracy of default C-value: (0.96 +/- 0.02)
In [258]:
best_mean - mean
Out[258]:
0.0
In [259]:
model.C
Out[259]:
1.0

It looks like the default does well as the best model that I found by changing the C-values, even though it is set to 1.

looking at it without the log-plotting

In [273]:
c_values = numpy.linspace(0, 1)[1:]
In [275]:
scores = [cross_val_score(model.set_params(C=c_value),
                          digits.data,
                          digits.target,
                          cv=k_folds,
                          n_jobs=-1) for c_value in c_values]
In [276]:
means = numpy.array([numpy.mean(score) for score in scores])
deviations = numpy.array([numpy.std(score) for score in scores])
In [278]:
seaborn.set_style("whitegrid")
figure = plot.figure()
axe = figure.gca()
line = plot.plot(c_values, means, axes=axe)
line = plot.plot(c_values, means + deviations, '--')
line = plot.plot(c_values, means - deviations, '--')
title = axe.set_title("Accuracy vs C")
label = axe.set_ylabel("Accuracy")
labels = axe.set_ylabel("C Value")

So apparently the reason for the log-scale is that the greatest changes occur at nearly 0, after that there's little to no improvement in increasing the penalty.

Changing Emacs Font Colors

I prefer a white background with dark text when I work, which generally works well-enough but some modes in Emacs create foreground-background colors that make it hard to impossible to read. The simplest way that I know of to change a font's colors is with the customize-face command.

Example: Changing This Headline

The original color for this headline in rst-mode was magenta (not by default, I had changed things a couple of times).

magenta_headline.png

To change it I moved my cursor onto the headline and entered M-x customize-face.

enter_customize_face.png

This brings up a prompt so you can enter the particular face you want to change. I didn't know the name that I wanted to change but since my cursor was already over the headline, it used that as the default so I could just hit enter to select it.

customize_face_prompt.png

As you can see the headline-face in this case is rst-level-1.

After I hit enter it took me to a dialog page to let me change the settings for this face.

customization_dialog.png

In this case I just wanted to change the background color so I clicked on the bottom Choose button. You can enter values directly if you have something in mind, but I didn't so this seemed like the easier way to do it, since it brings up a color picker which lets you see what the colors look like.

color_selector.png

I decided to go with deep sky blue so I moved my cursor over that row in the color picker and hit enter. This closes the color-picker and updates the color in the customization dialog.

updated_color.png

This changes the dialog but doesn't actually change the settings. To do that you have to move you cursor to Apply and Save and hit enter. This updates the sample color so you can see what it now looks like.

applied_change.png

When I then switched back to my original editing buffer, the headline now had a blue background.

blue_headline.png

Which doesn't look as nice as I thought it would so I changed again. Same steps, different colors.

Describe Face

Another useful command is M-x describe-face which shows you the settings for a face. This is what it showed after I made another change to my headline color.

describe_face.png

If you click on customize this face up at the top-right of the window it takes you to the same dialog that the M-x customize-face command takes you to.

Monitoring Events With Chromium

If you have a chromium-based browser you can find out what events are affecting a particular item on you web-page using the monitorEvents function.

Monitoring Events

Inspect The Element

First right-click on the element that you are interested in and pick "Inspect element" from the context-menu.

inspect_element.png

Enter the Event Type

There are multiple event types to chooske from (mouse, key, touch, and control). In this example I'll monitor mouse events. In the javascript console enter:

monitorEvents($0, "mouse")

Now, as you do things with your mouse on the element, the console output will show you the the events as they happen.

mouse_events.png

Listing Event Listeners

To see the event-listeners associated with the element enter the following at the console.

getEventListeners($0)
get_event_listeners.png

Picking Elements At The Console

You don't have to use "Inspect this element" and $0, you can grab an element at the console with javascript instead.

monitorEvents(document.getElementById("changing-what-you-monitor"), "mouse")

Will monitor mouse-events for the headline to this sub-section.

Baysian Spam Detector

Spam detection with Bayesian Networks

These are my notes for the Bayesian Networks section of the udacity course on artifical intelligence.

In [22]:
# python standard library
from fractions import Fraction
import sys
In [23]:
# it turns out 'reduce' is no longer a built-in function in python 3
if sys.version_info.major >= 3:
    from functools import reduce
In [24]:
spam = 'offer is secret, click secret link, secret sports link'.split(',')
print(len(spam))
3
In [25]:
ham = 'play sports today, went play sports, secret sports event, sports is today, sports costs money'.split(',')
print(len(ham))
5

The terms have to be changed to be either all plural or all singular. In this case I changed 'sport' to 'sports' where needed.

The SpamDetector classes

I originally implemented everything as functions, but decided it was too scattered and created these after the fact, which is why there's all the duplication below. I left the old code to validate these classes.

The MailBag

This class holds either spam or ham. It actually holds both but the idea is one of them is the real type of interest.

In [26]:
class MailBag(object):
    """
    A place to put spam or ham
    """
    def __init__(self, mail, other_mail, k=0):
        """
        :param:
         - `mail`: list of example mail
         - `other_mail`: mail not in this class (e.g. spam if this is ham)
         - `k`: Laplace smoothing constant
        """
        self.mail = mail
        self.other_mail = other_mail
        self.k = k
        
        self._bag = None
        self._probability = None
        self._vocabulary_size = None
        self._sample_size = None
        return

    @property
    def vocabulary_size(self):
        """
        :return: count of unique words in all examples
        """
        if self._vocabulary_size is None:
            self._vocabulary_size = len(set(self.bag) | set(self.bag_boy(self.other_mail)))
        return self._vocabulary_size

    @property
    def bag(self):
        """
        :return: list of words in `mail`
        """
        if self._bag is None:
            self._bag = self.bag_boy(self.mail)
        return self._bag

    @property
    def sample_size(self):
        """
        :return: count of mail in both spam and not spam
        """
        if self._sample_size is None:
            self._sample_size = len(self.mail + self.other_mail)
        return self._sample_size
    
    @property
    def probability(self):
        """
        :return: count of this mail/total sample size
        """
        if self._probability is None:
            SPAM_AND_HAM = 2
            self._probability = self.l_probability(len(self.mail),
                                                   len(self.mail) + len(self.other_mail),
                                                   SPAM_AND_HAM)
        return self._probability

    def bag_boy(self, lines):
        """
        :param:
         - `lines`: list of lines

        :return: list of words taken from the lines
        """
        tokenized = (line.split() for line in lines)
        bag = []
        for tokens in tokenized:
            for token in tokens:
                bag.append(token)
        return bag

    def l_probability(self, event_size, sample_size, classes):
        """
        :param:
         - `event_size`: count of events of interest
         - `sample_size`: count of all events
         - `classes`: count of all classes of events

        :return: probability with Laplace Smoothing
        """        
        return Fraction(event_size + self.k,
                        sample_size + classes * self.k)

    def p_message(self, message):
        """
        :param:
         - `message`: line of mail

        :return: p(message|this class)
        """
        probabilities = (self.p_word(word) for word in message.split())
        return reduce(lambda x, y: x * y, probabilities) * self.probability
        
    def p_word(self, word):
        """
        :param:
         - `word`: string to check for
        :return: fraction of word occurence in bag
        """
        return self.l_probability(self.word_count(word), len(self.bag), self.vocabulary_size)
    
    def word_count(self, word):
        """
        :param:
         - `word`: string to check for
        :return: number of times word appears in bag
        """
        return sum((1 for token in self.bag if token == word))

SpamDetector

In [27]:
class SpamDetector(object):
    """
    A bayesian network spam detector
    """
    def __init__(self, spam, ham, k=0):
        """
        :param:
         - `spam`: list of example spam lines
         - `ham`: list of example ham_lines
         - `k`: laplace smoothing constant
        """
        self.spam = MailBag(mail=spam, k=k, other_mail=ham)
        self.ham = MailBag(mail=ham, k=k, other_mail=spam)
        return

    def p_spam_given_message(self, message):
        """
        :param:
         - `message`: line to check if it's spam
        :return: probability that it's spam
        """        
        p_message_given_spam = self.spam.p_message(message) 
        return p_message_given_spam/ (p_message_given_spam +
                                      self.ham.p_message(message))

# leave this in the same cell so updating the class updates the instance
detector = SpamDetector(spam=spam, ham=ham)
l_detector = SpamDetector(spam=spam, ham=ham, k=1)

What is the size of the vocabulary?

In [28]:
def bagger(mail):
    """
    converts list of lines into list of tokens
    
    :param:
     - `mail`: list of space-separated lines
    :return: list of words in `mail`
    """
    mail_tokenized = (line.split() for line in mail)
    mail_bag = []
    for tokens in mail_tokenized:
        for token in tokens:
            mail_bag.append(token)
    return mail_bag

spam_bag = bagger(spam)
ham_bag = bagger(ham)
            
In [29]:
def assert_equal(expected, actual, description):
    assert expected == actual, \
        "'{2}'\nExpected: {0}, Actual: {1}".format(expected, actual,
                                                   description)
In [30]:
vocabulary_list = set(spam_bag) | set(ham_bag)
vocabulary = len(set(spam_bag) | set(ham_bag))
assert_equal(spam_bag, detector.spam.bag, 'check spam bags')
assert_equal(ham_bag, detector.ham.bag, 'ham bags')
assert_equal(vocabulary, detector.spam.vocabulary_size, 'vocabulary size')
print(vocabulary)
12

what is the probability that a piece of mail is spam?

In [31]:
mail_count = len(ham) + len(spam)
assert_equal(mail_count, detector.spam.sample_size, 'mail count')
p_spam = Fraction(len(spam), mail_count)
assert_equal(p_spam, Fraction(3, 8), 'p-spam known')
assert_equal(p_spam, detector.spam.probability, 'p-spam detector')
print(p_spam)
3/8

what is p('secret'| spam)?

In [32]:
def word_count(bag, word):
    """
    count the number of times a word is in the bag

    :param:
     - `bag`: collection of words
     - `word`: word to count
    :return: number of times word appears in bag
    """
    return sum((1 for token in bag if token == word))
In [33]:
def p_word(bag, word, k=0, sample_space=12):
    """
    fraction of times word appears in the bag

    :param:
     - `bag`: collection of words
     - `word`: word to count in bag
     - `k`: laplace smoothing constant
     - `sample_space`: total number of words in vocabulary
    :return: Fraction of total bag that is word
    """
    return Fraction(word_count(bag, word) + k, len(bag) + k * sample_space)
In [34]:
p_secret_given_spam = p_word(spam_bag, 'secret')
assert p_secret_given_spam == Fraction(3, 9)
assert_equal(p_secret_given_spam, detector.spam.p_word('secret'),
             'secret given spam')
print(p_secret_given_spam)
1/3

what is p('secret'| ham)?

In [35]:
p_secret_given_ham = p_word(ham_bag, 'secret')
assert p_secret_given_ham == Fraction(1, 15)
assert_equal(p_secret_given_ham, detector.ham.p_word('secret'), 'p(secret|ham)')
print(p_secret_given_ham)
1/15

You get a message with one word - 'sports', what is p(spam|'sports')?

In [36]:
%%latex
$p(spam|`sports') = \frac{p(`sports' | spam)p(spam)}{p(`sports')}$
In [37]:
p_sports_given_spam = p_word(spam_bag, 'sports')
assert p_sports_given_spam == Fraction(1, 9)
assert_equal(p_sports_given_spam, detector.spam.p_word('sports'),
             'p(sports|spam)')
print(p_sports_given_spam)
1/9
In [38]:
p_sports_given_ham = p_word(ham_bag, 'sports')
expected = Fraction(1, 3)
assert p_sports_given_ham == expected
assert_equal(p_sports_given_ham, detector.ham.p_word('sports'),
             'p(sports|ham)')
In [39]:
p_ham = Fraction(len(ham), mail_count)
assert_equal(p_ham, detector.ham.probability, 'p(ham)')
print(p_ham)
5/8
In [40]:
p_sports = Fraction(word_count(spam_bag, 'sports') + word_count(ham_bag, 'sports'), vocabulary)
print(p_sports)
1/2
In [41]:
p_spam_given_sports = (p_sports_given_spam * p_spam)/(p_sports_given_spam * p_spam + p_sports_given_ham * p_ham)
assert p_spam_given_sports == Fraction(3, 18)
assert_equal(p_spam_given_sports, detector.p_spam_given_message('sports'),
             'p(spam|sports)')
print(p_spam_given_sports)
1/6

Given the message 'secret is secret', what is the probability that it is spam?

In [42]:
%%latex
$p(spam|message) = \frac{p(message|spam)p(spam}{p(message|spam)p(spam) + p(message|ham)p(ham)}$

So, the question here is, how do you calculate the probabilities for the entire message instead of for a single word? The answer turns out to be to multiply the probability for each of the words together - so p('secret is secret'| spam) is the product p('secret'|spam) x p('is'|spam) x p('secret'|spam)

In [43]:
%%latex
$p(spam|sis) = \frac{p(s|spam)p(i|spam)p(s|spam)p(spam)}{p(s|spam)p(i|spam)p(s|spam)p(spam) + p(s|ham)p(i|ham)p(s|ham)p(ham)}$

Where s = 'secret', i = 'is' and sis='secret is secret'.

In [44]:
p_is_given_spam = p_word(spam_bag, 'is')
assert_equal(p_is_given_spam, detector.spam.p_word('is'), 'p(is|spam)')
p_is_given_ham = p_word(ham_bag, 'is')
assert_equal(p_is_given_ham, detector.ham.p_word('is'), 'p(is|ham)')
In [45]:
def p_message_given_class(message, bag, class_probability, k=0, sample_space=12):
    """
    :param:
     - `message`: string of words
     - `bag`: bag of words
     - `class_probability`: probability for this class (e.g. p(spam))
     - `k`: Laplace smoothing constant
     - `sample_space`: Size of the vocabulary
    :return: p(message|classification) * p(classification)
    """
    probabilities = (p_word(bag, word, k=k, sample_space=sample_space) for word in message.split())
    probability = class_probability
    for p in probabilities:
        probability *= p
    return probability
In [46]:
def p_spam_given_message(message, k=0, sample_space=12):
    """
    :param:
     - `message`: string of words
     - `k`: Laplace Smoothing constant
     - `sample_space`: total count of words in spam/ham bags
    :return: probability message is spam
    """
    spam_probability = p_spam if k == 0 else lp_spam
    ham_probability = p_ham if k == 0 else lp_ham
    p_m_given_spam = p_message_given_class(message, spam_bag, spam_probability, k=k, sample_space=sample_space)
    p_m_given_ham = p_message_given_class(message, ham_bag, ham_probability, k=k, sample_space=sample_space)
    return p_m_given_spam/(p_m_given_spam + p_m_given_ham)
In [47]:
message = 'secret is secret'
expected = Fraction(25, 26)
p_sis_given_spam = (p_secret_given_spam * p_is_given_spam * p_secret_given_spam
                    * p_spam)
assert p_message_given_class(message, spam_bag, p_spam) == p_sis_given_spam
assert_equal(p_sis_given_spam, detector.spam.p_message(message), 'p(sis|spam)')

p_sis_given_ham = p_secret_given_ham * p_is_given_ham * p_secret_given_ham * p_ham
assert p_message_given_class(message, ham_bag, p_ham) == p_sis_given_ham
assert_equal(p_sis_given_ham, detector.ham.p_message(message), 'p(sis|ham)')

p_spam_given_sis = p_sis_given_spam / (p_sis_given_spam + p_sis_given_ham)
assert_equal(p_spam_given_sis, detector.p_spam_given_message(message), 'p(spam|sis)')
assert p_spam_given_message(message) == p_spam_given_sis
assert p_spam_given_sis == expected
print(p_spam_given_sis)
25/26

What is the probability that "today is secret" is spam?

In [48]:
%%latex
$p(spam|tis) = \frac{p(t|spam)p(i|spam)p(s|spam)p(spam)}{p(t|spam)p(i|spam)p(s|spam)p(spam) + p(t|ham)p(i|ham)p(s|ham)p(ham)}$
In [49]:
tis = 'today is secret'
p_spam_given_tis = p_spam_given_message(tis)
print(p_spam_given_tis)
assert p_spam_given_tis == 0
assert_equal(p_spam_given_tis, detector.p_spam_given_message(tis),
             'p(spam|tis)')
0
In [50]:
'today' in spam_bag
Out[50]:
False

Since one of the words isn't in the spam bag of words, the numerator is going to be 0 (p('today'|spam) = 0) so the probability overall is 0.

Laplace Smoothing

When a single missing word drops the probability to 0, this means your model is overfitting the data. To get around this Laplace Smoothing is used.

In [51]:
%%latex
$p(s) = \frac{s_{count} + k}{total_{count} + k * |classes|}$

let k = 1.

What is the probability that a message is spam if you have 1 example message and it's spam?

In [52]:
def l_probability(class_count, total_count, k=1, classes=2):
    """
    :param:
     - `class_count`: size of event space
     - `total_count`: size of sample space
     - `k`: constant to prevent 0 probability
     - `classes`: total number of events
    :return: probability of class_count with Laplace Smoothing
    """
    return Fraction(class_count + k, total_count + classes * k)
In [53]:
k = 1
# classes = spam, ham
number_of_classes = 2
In [54]:
messages = 1
spam_messages = 1
actual = Fraction(spam_messages + k, messages + number_of_classes * k)
assert actual == Fraction(2, 3)
                            
print(actual)
2/3

What if you have 10 messages and 6 are spam?

In [55]:
messages, spam_messages = 10, 6
actual = l_probability(spam_messages, messages, k, number_of_classes)
expected = Fraction(spam_messages + k, messages + number_of_classes * k)
assert actual == expected
print(actual)
7/12

What if you have 100 messages and 60 are spam?

In [56]:
messages, spam_messages = 100, 60
print(l_probability(spam_messages, messages, k, number_of_classes))
61/102

spam/ham with Laplace Smoothing

What are the probabilities that a message is spam or ham with k=1?

In [57]:
lp_spam = l_probability(total_count=mail_count, class_count=len(spam))
assert_equal(lp_spam, l_detector.spam.probability, 'p(spam)')
lp_ham = l_probability(total_count=mail_count, class_count=len(ham))
assert_equal(lp_ham, l_detector.ham.probability, 'p(ham)')
print(lp_spam)
print(lp_ham)
2/5
3/5

What are p('today'|spam) and p('today'|ham)?

In this case the class-count isn't 2 (for spam or ham) but 12, for the total number of words in the vocabulary.

In [58]:
print(p_word(spam_bag, 'today', k=1, sample_space=vocabulary))
1/21
In [59]:
lp_today_given_spam = l_probability(total_count=len(spam_bag),
                                    class_count=word_count(spam_bag, 'today'),
                                    classes=vocabulary)
assert_equal(lp_today_given_spam, l_detector.spam.p_word('today'), 'p(today|spam)')
lp_today_given_ham = l_probability(total_count=len(ham_bag),
                                   class_count=word_count(ham_bag, 'today'),
                                   classes=vocabulary
)
assert_equal(lp_today_given_ham, l_detector.ham.p_word('today'),
             'p(today|ham)')
assert lp_today_given_spam == Fraction(1, 21)
assert lp_today_given_ham == Fraction(1, 9)
print('p(today|spam) = {0}'.format(lp_today_given_spam))
print('p(today|ham) = {0}'.format(lp_today_given_ham))
p(today|spam) = 1/21
p(today|ham) = 1/9

What is p(spam|m) if m = 'today is secret' and k=1?

In [60]:
tis = 'today is secret'
lp_is_given_spam = p_word(spam_bag, 'is', k=1, sample_space=vocabulary)
assert_equal(lp_is_given_spam, l_detector.spam.p_word('is'), 'p(is|spam)')

lp_is_given_ham = p_word(ham_bag, 'is', k=1, sample_space=vocabulary)
assert_equal(lp_is_given_ham, l_detector.ham.p_word('is'), 'p(is|ham)')

lp_secret_given_spam = p_word(spam_bag, 'secret', k=1, sample_space=vocabulary)
assert_equal(lp_secret_given_spam, l_detector.spam.p_word('secret'), 'p(secret|spam)')

lp_secret_given_ham = p_word(ham_bag, 'secret', k=1, sample_space=vocabulary)
assert_equal(lp_secret_given_ham, l_detector.ham.p_word('secret'), 'p(secret|ham)')

lp_tis_given_spam = lp_today_given_spam * lp_is_given_spam * lp_secret_given_spam * lp_spam
lp_tis_given_ham =  lp_today_given_ham * lp_is_given_ham * lp_secret_given_ham * lp_ham
lp_spam_given_tis = Fraction(lp_tis_given_spam, lp_tis_given_spam + lp_tis_given_ham)

assert_equal(lp_tis_given_spam, l_detector.spam.p_message(tis), 'p(tis|spam)')
assert_equal(lp_tis_given_ham, l_detector.ham.p_message(tis), 'p(tis|ham)')
assert_equal(lp_spam_given_tis, l_detector.p_spam_given_message(tis), 'p(spam|tis)')
print(lp_spam_given_tis)
324/667

This is just more double-checking to make sure that the functions I originally wrote match the hand-calculated answers.

In [61]:
actual = p_message_given_class(tis, ham_bag, lp_ham, k=1, sample_space=vocabulary)
assert lp_tis_given_ham == actual, "Expected: {0} Actual: {1}".format(lp_tis_given_ham, actual)
In [62]:
actual = p_spam_given_message(message=tis, k=1, sample_space=vocabulary)
assert lp_spam_given_tis == actual , "Expected: {0} Actual: {1}".format(lp_spam_given_tis, actual)

Re-do

Since the code ended up being so messy I'm going to re-do the last example using the class-based version only.

In [64]:
spam_detector = SpamDetector(spam=spam, ham=ham, k=1)
message = 'today is secret'
answer = spam_detector.p_spam_given_message(message)
print("p(spam|'today is secret') = {0}".format(answer))
p(spam|'today is secret') = 324/667
In [65]:
assert_equal(lp_spam_given_tis, answer, "p(spam|'today is secret')")

Building a Jupyter Docker Container

This is how I built a docker container to run a jupyter server. The reason why I did it was that I wanted to isolate any non-python dependencies I needed to install, but so far I haven't done any, so this could actually be done more easily using virtualenv, but this is a starting point.

The Dockerfile

This is the configuration for building the docker image.

FROM ubuntu:latest
WORKDIR /code
RUN apt-get update && apt-get -y upgrade
RUN apt-get install -y build-essential python-dev
RUN apt-get install -y python python-distribute python-pip
RUN pip install pip --upgrade
ADD requirements.txt /code
RUN pip install -r requirements.txt
RUN mkdir /notebooks
CMD jupyter notebook --no-browser --ip 0.0.0.0 --port 8888 /notebooks

The FROM line shows that I'm building my container using an ubuntu image (the latest image). The WORKDIR sets the current working directory so commands that are run will look there for files. The next set of RUN lines just say to update apt-get and install some basic python packages. The ADD line takes the requirements.txt file in the directory where I'm going to run this and put it in /CODE which I pointed to with the WORKDIR line. The next RUN commands install my python dependencies and make a folder called /notebooks to put the jupyter notebooks in. The last line (CMD) is what will be executed when the container is run.

Building the Image

If the docker-file is stored in a file named jupyter.dockerfile next to the requirements.txt file, both of which are in the directory where I run the build command. To build it (and name the image jupyter) I'd run the command:

docker -f jupyter.dockerfile -t jupyter:latest .

Running the Server

To run the server in the same directory where the notebooks should be stored and using the default port of 8888:

docker --name jupyter -p 8888:8888 -v $PWD:/notebooks -d jupyter

Now the server should be reachable at http://localhost:8888.

Linking Two Docker Containers

I think this is the deprecated to do it, now that they have docker connect, but it works, so I'll keep the notes.

My goal was to link a container that I'd set up to run a Jupyter Notebook server to a Mongo DB server. I'll leave out the installation notes and just assume that there's a docker image named mongo for MongoDB and one named jupyter for my Jupyter server.

First I'll run MongoDB. MongoDB is going to use /data/db to store its data-files so I'm going to mount my data directory there.

docker run --name mongo -v $PWD/data:/data/db -d mongo

Next I'll run the Jupyter container, using the --link option to point it to the mongo container. The jupyter notebook is running on port 8888 and looking for notebooks in the /notebooks directory so I'll mount my current working director there.

docker run --name jupyter -v $PWD:/notebooks -p 8888:8888 --link mongo -d jupyter

At this point, opening a browser at http://localhost:8888 should open up the jupyter-server's home.

Running Redis in Docker

These are the quick notes.

Install

docker pull redis
docker run -d -p 6379:6379 --name redis redis

Use it with python-redis

import redis
client = redis.Redis("localhost", 6379)
client.keys()

The client.keys() is a double-check. The client object won't actually try to connect to the server until you call it.

Running MongoDB With Docker

I am working through O'Reilly's Data Visualization with Python and JavaScript and the chapter on reading and writing data uses MongoDB (among other things) as an example. I've wanted to isolate my exploratory/development software installation as much as possible. With python this is fairly easy (thanks to virtualenv), and npm can make isolating javascript installations easier, but I wanted to try and use Docker to isolate any other things I had to install so this is a first step. It's actuall a second step, since I already have a Redis container, but I didnt' take any notes when I installed it so I don't really remember doing it, and I'm going to extend the use of docker to handle all the intallations I make while reading this book so it's a first-step for this reason, at least.

Anyway, here's what to do.

First pull the mongo docker image.

docker pull mongo

To check that it's there after everything is done you can run docker images and you should see something like this.

REPOSITORY          TAG                 IMAGE ID            CREATED             SIZE
mongo               latest              282fd552add6        2 days ago          336.1 MB
redis               latest              be9c5a746699        5 weeks ago         184.9 MB

In this case I want the connection to Mongo DB to be available so I'm going to bind its local port (27017) to my host. I'm also going mount my local data file in the container so it will save its data my local folder.

docker run --name mongo -p 27017:27017 -v $PWD/data:/data/db -d mongo

The --name flag gives the name that you'll see if you run docker ps to see the running containers. -p 27017:27017 makes it available to my host machine via localhost:27017. -v $PWD/data:/data/db mounts the data folder in the directory where I ran the docker command inside the container at /data/db. -d says to run it as a daemon. Finally the last argument mongo identifies the image for the container.

At this point MongoDb is accessible from my host machine, so, using pymongo I can connect to it using something like this.

from pymongo import MongoClient

client = MongoClient('localhost', 27017)

And that's it.